
Introduction
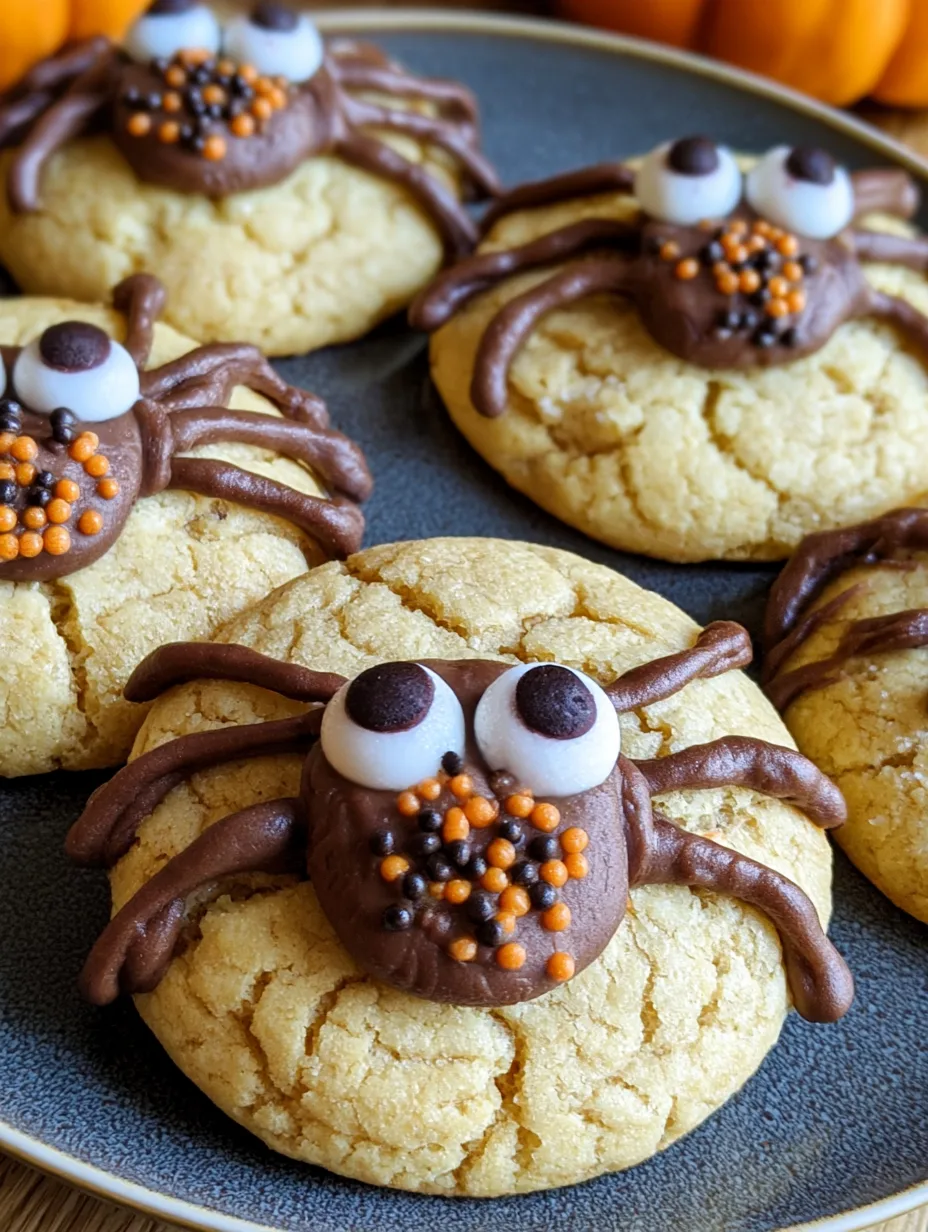
Crispy around the edges, soft in the center, and decorated with adorable chocolate spider legs, Spider Cookies bring instant Halloween fun to the dessert table. These playful cookies combine a buttery, chocolatey base with a whimsical design that makes them especially exciting for kids and adults alike. They look impressive, yet you do not need advanced decorating skills to make them. Whether you are preparing treats for a Halloween party, school event, or cozy family baking night, these cookies are guaranteed to attract attention. You’ll learn how to make spooky, delicious cookies that are as fun to create as they are to eat.
Why You’ll Love This Recipe
There is something wonderfully festive about Spider Cookies. Their cute spider design transforms a simple homemade cookie into a Halloween centerpiece without requiring complicated techniques or specialty equipment.
The cookies have a delicious texture contrast that makes every bite satisfying. The edges turn lightly crisp while the centers remain soft and tender. A rich chocolate candy adds a creamy, melt-in-your-mouth element, while the decorative chocolate legs provide an extra touch of sweetness.
You will also love how approachable this recipe feels. The dough comes together with familiar pantry ingredients, and you can decorate the cookies once they have cooled. Kids can help add the chocolate bodies and pipe the spider legs, making this a great family baking activity.
Best of all, Spider Cookies work for almost any Halloween gathering. Serve them alongside cupcakes, brownies, popcorn, or hot cocoa for a dessert spread that feels festive without taking all day to prepare.
Ingredients
For the cookie dough, you will need 1/2 cup (113 g) unsalted butter, softened; 1/2 cup (100 g) granulated sugar; 1/2 cup (100 g) packed brown sugar; 1 large egg (about 50 g); 1 teaspoon (5 ml) vanilla extract; 1 1/2 cups (188 g) all-purpose flour; 1/2 teaspoon (3 g) baking soda; and 1/4 teaspoon (1.5 g) salt.
For decorating, use about 24 chocolate truffles or round chocolate candies, depending on cookie size. You will also need 1/2 cup (85 g) semi-sweet chocolate chips or melting chocolate for the spider legs and small candy eyes for each cookie.
Let the butter soften naturally before mixing. Soft butter creams more smoothly with the sugars and helps create a tender cookie texture.
Pro Tips
1. Cream the butter and sugars thoroughly. Beat the softened butter with both sugars until the mixture looks light and fluffy. This step incorporates air into the dough and helps produce cookies with a pleasant texture. Avoid using melted butter because it can make the cookies spread too much.
2. Avoid overbaking. Remove the cookies when the edges look lightly golden but the centers still appear slightly soft. They will continue cooking on the hot baking sheet for a few minutes. Overbaking can turn the cookies dry and make the final texture less tender.
3. Decorate while the timing is right. Add the chocolate body while the cookies remain slightly warm if you want it to adhere naturally. Allow the cookies to cool before piping the legs so the chocolate decoration stays neat. If your melted chocolate feels too thick, add a tiny amount of shortening or coconut oil to make piping easier.
For especially neat Spider Cookies, use a small piping bag or a zip-top bag with a tiny corner snipped off. This gives you much better control over the spider-leg design than a spoon.
Step-by-Step Instructions
Step 1: Prepare the oven and baking sheets.
Preheat your oven to 350°F (175°C). Line two baking sheets with parchment paper or silicone baking mats. This prevents sticking and makes cleanup much easier.
Step 2: Cream the butter and sugars.
Place the softened butter, granulated sugar, and brown sugar in a large mixing bowl. Beat for about 2 to 3 minutes until creamy and fluffy. Scrape down the sides of the bowl so everything combines evenly.
Step 3: Add the wet ingredients.
Beat in the egg and vanilla extract until smooth. Do not worry if the mixture looks slightly uneven at first. It will come together once you add the dry ingredients.
Step 4: Mix the dry ingredients.
In a separate bowl, whisk together the flour, baking soda, and salt. Gradually add the dry mixture to the wet ingredients. Mix just until a soft cookie dough forms. Avoid excessive mixing because it can make the cookies tougher.
Step 5: Shape the cookies.
Scoop approximately 1 1/2 tablespoons of dough for each cookie and roll it into a ball. Place the dough balls about 2 inches apart on the prepared baking sheets. Gently flatten each one just enough to encourage even baking.
Step 6: Bake.
Bake for approximately 9 to 12 minutes, depending on cookie size. Look for lightly golden edges with soft centers. Remove the cookies from the oven and let them rest on the baking sheet for several minutes.
Step 7: Add the chocolate bodies.
While the cookies are still warm, gently press one chocolate truffle or round chocolate candy into the center of each cookie. Press lightly so the cookie stays intact.
Step 8: Add the spider legs and eyes.
Allow the cookies to cool until the chocolate body feels secure. Melt the chocolate chips in short microwave intervals, stirring between each interval. Transfer the melted chocolate to a piping bag or zip-top bag. Pipe four legs on each side of the chocolate body, then add small candy eyes.
Step 9: Let the decorations set.
Place the decorated cookies on a tray and allow the chocolate to firm completely. Once set, your Spider Cookies are ready to serve, package, or display.

Variations
You can easily customize these Halloween cookies to match your party theme. For a chocolate-lover’s version, replace 2 tablespoons of flour with unsweetened cocoa powder for a deeper chocolate flavor.
For peanut butter fans, use a chocolate-peanut butter candy as the spider body. The combination of buttery cookie dough and peanut butter chocolate creates a rich, satisfying variation.
You can also make a colorful version by using different candy eyes. Try large googly-style eyes for an exaggerated spooky look or tiny eyes for cute little spiders.
For a dairy-free adaptation, use plant-based butter and dairy-free chocolate candies. Check all candy labels carefully to ensure the products fit your dietary needs.
These simple changes let you create several versions while keeping the basic Spider Cookies recipe familiar and easy.
Storage and Serving
Store completely cooled Spider Cookies in an airtight container at room temperature for up to 5 days. Place parchment paper between layers if the chocolate decorations feel soft or sticky. For longer storage, freeze the undecorated cookies in a freezer-safe container for up to 2 months. Thaw them at room temperature before decorating.
For Halloween parties, arrange the cookies on a large platter surrounded by candy corn, chocolate pieces, or festive sprinkles. You can also package individual cookies in clear treat bags tied with Halloween ribbon for party favors.
Serve them with warm milk, hot chocolate, coffee, or apple cider. A platter of Spider Cookies also pairs beautifully with other Halloween desserts, creating a fun assortment of homemade treats.
FAQs
Can I make Spider Cookies ahead of time?
Yes. Bake the cookies a day or two before serving and store them in an airtight container. Decorate them closer to your event if you want the chocolate details to look especially fresh.
Why did my cookies spread too much?
Soft or melted butter can cause excessive spreading. Make sure your butter is softened but not liquid, and chill the dough briefly if your kitchen is particularly warm.
Can I use different chocolate candies for the spider body?
Absolutely. Round truffles, chocolate-covered peanut butter cups, or other similarly shaped candies can work well. Choose a candy that fits comfortably in the center of the cookie.
How do I make neat spider legs?
Use melted chocolate in a small piping bag or zip-top bag. Snip only a tiny opening and pipe thin lines from the candy body outward. Practice a few lines on parchment first if needed.
Can kids help make these cookies?
Definitely. Children can help roll the dough, add candy eyes, and decorate the finished cookies. Adult supervision is recommended when using the oven and melted chocolate.
This Spider Cookies recipe is comfort food at its finest — buttery, chocolatey, playful, and wonderfully spooky. It’s the kind of treat that turns an ordinary baking session into a memorable Halloween activity. From the soft cookie centers to the sweet chocolate spiders perched on top, every detail adds festive personality. You can make them for parties, school celebrations, family movie nights, or simply because October calls for something deliciously creepy. Gather your favorite chocolate candies, invite the kids into the kitchen, and enjoy creating a batch of homemade Halloween treats that are almost too cute to eat.
Print
Spider Cookies
- Total Time: 45
Description
These spooky little cookies are the sweetest Halloween treat for your dessert table. Spider Cookies are cute, chocolatey, and so much fun to make with the whole family.
Ingredients
- 1/2 cup (113 g) unsalted butter, softened
- 1/2 cup (100 g) granulated sugar
- 1/2 cup (100 g) packed brown sugar
- 1 large egg
- 1 teaspoon (5 ml) vanilla extract
- 1 1/2 cups (188 g) all-purpose flour
- 1/2 teaspoon (3 g) baking soda
- 1/4 teaspoon (1.5 g) salt
- 24 chocolate truffles or round chocolate candies
- 1/2 cup (85 g) semi-sweet chocolate chips or melting chocolate
- 48 small candy eyes
Instructions
- Preheat the oven to 350°F (175°C) and line baking sheets with parchment paper.
- Cream the softened butter, granulated sugar, and brown sugar until light and fluffy.
- Beat in the egg and vanilla extract until smooth.
- Whisk together the flour, baking soda, and salt in a separate bowl.
- Gradually add the dry ingredients to the wet mixture and mix just until a soft dough forms.
- Scoop about 1 1/2 tablespoons of dough per cookie and roll into balls.
- Place the dough balls 2 inches apart on prepared baking sheets and gently flatten them.
- Bake for 9 to 12 minutes, until the edges are lightly golden and the centers remain soft.
- Press one chocolate truffle or round chocolate candy into the center of each warm cookie.
- Melt the chocolate chips and transfer the chocolate to a piping bag or zip-top bag.
- Pipe four spider legs on each side of the chocolate body.
- Add candy eyes and allow the chocolate decorations to set completely before serving.
- Prep Time: 15
- Cook Time: 20
- Category: Cooking
- Cuisine: American