
Introduction
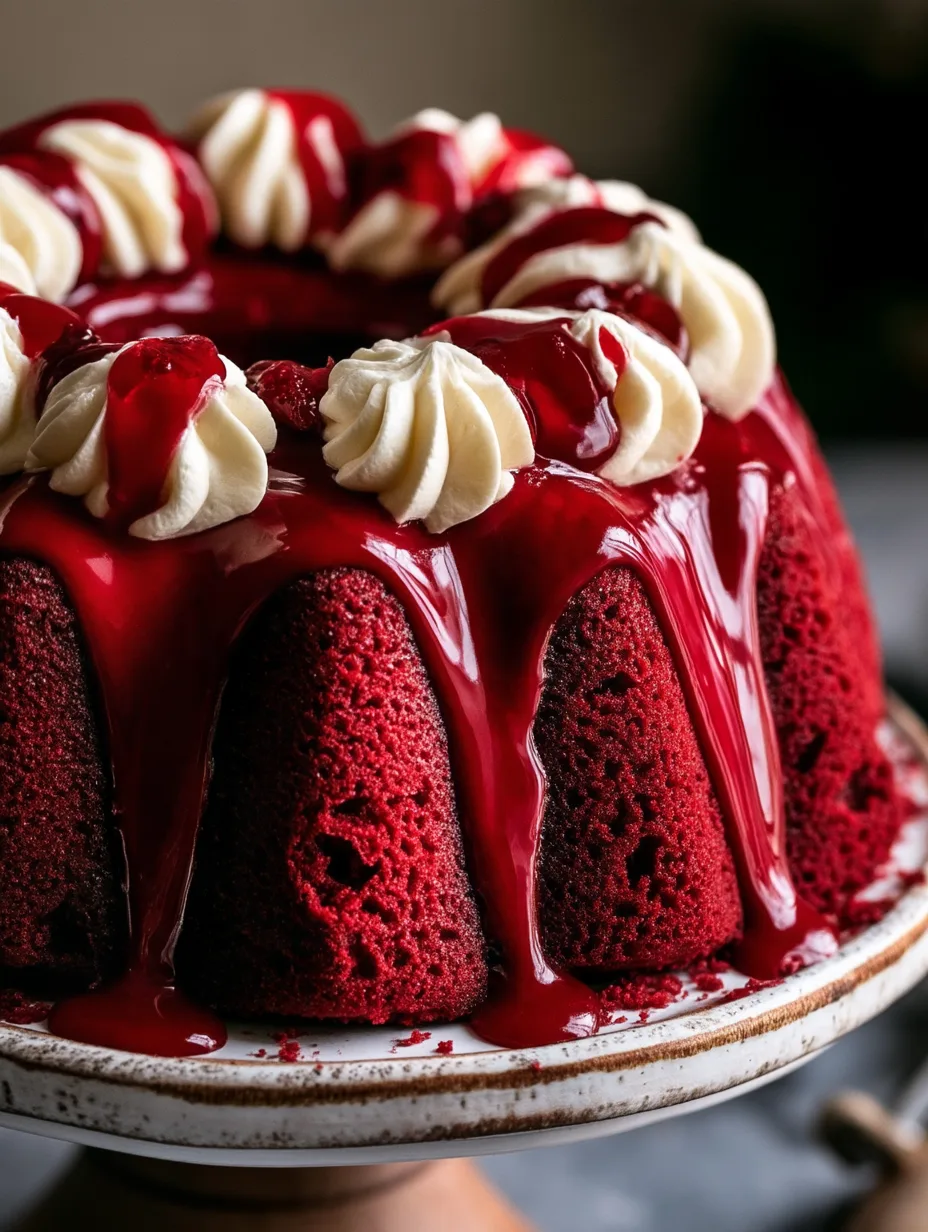
Velvety, rich, and irresistibly creamy, Red Velvet Cheesecake brings together two beloved desserts in one spectacular treat. Imagine a buttery chocolate cookie crust, a smooth cheesecake filling with a hint of cocoa, and that signature deep red color that makes every slice look stunning. This dessert delivers the perfect balance of tangy cream cheese, delicate chocolate flavor, and luxurious sweetness. Whether you’re celebrating Valentine’s Day, Christmas, a birthday, or simply craving something special, this cheesecake makes every occasion feel memorable. You’ll learn how to create a beautiful, bakery-style Red Velvet Cheesecake with a creamy texture, gorgeous presentation, and delicious flavor.
Why You’ll Love This Recipe
Red Velvet Cheesecake combines the elegance of classic red velvet cake with the richness of traditional cheesecake. Instead of choosing between two favorite desserts, you get both in every delicious slice.
The cheesecake filling delivers a smooth, creamy texture with a subtle cocoa flavor. Meanwhile, the chocolate cookie crust adds a satisfying crunch that contrasts beautifully with the soft filling. A touch of tanginess from the cream cheese balances the sweetness, creating a dessert that tastes indulgent without feeling overwhelmingly sugary.
The vibrant red color makes this cheesecake particularly appealing for celebrations. Serve it at Valentine’s Day dinners, holiday gatherings, birthday parties, or family celebrations, and watch everyone admire its beautiful appearance.
Another reason to love this recipe is its make-ahead convenience. Cheesecake needs time to chill, which means you can prepare it the day before your event. When guests arrive, simply add your favorite toppings and serve.
Even better, you don’t need professional baking skills to achieve impressive results. With simple ingredients, straightforward instructions, and a little patience, you can create a gorgeous homemade dessert that looks and tastes like something from a bakery.
Ingredients
These measurements make one 9-inch cheesecake, approximately 12 servings.
For the chocolate cookie crust:
-
2 cups (200 g) chocolate cookie crumbs: Use finely crushed chocolate sandwich cookies or chocolate graham crackers.
-
6 tablespoons (85 g) unsalted butter, melted: Creates a rich, firm crust.
-
2 tablespoons (25 g) granulated sugar: Adds sweetness if using unsweetened chocolate crumbs.
For the cheesecake filling:
-
24 oz (680 g) full-fat cream cheese, softened: Provides the creamy foundation.
-
1 cup (200 g) granulated sugar: Sweetens the filling.
-
3 large eggs, room temperature: Help the cheesecake set.
-
1/2 cup (120 g) sour cream: Adds moisture and tanginess.
-
1/4 cup (60 ml) heavy cream: Creates a silky consistency.
-
2 tablespoons (10 g) unsweetened cocoa powder: Adds subtle chocolate flavor.
-
1 tablespoon (15 ml) vanilla extract: Enhances the flavor.
-
1 tablespoon (15 ml) red food coloring: Creates the signature red appearance.
-
1 teaspoon (5 ml) white vinegar: Adds a subtle traditional red velvet tang.
-
1 tablespoon (8 g) cornstarch: Helps stabilize the filling.
For the topping:
-
1/2 cup (120 ml) heavy whipping cream.
-
4 oz (115 g) cream cheese, softened.
-
1/4 cup (30 g) powdered sugar.
-
1 teaspoon (5 ml) vanilla extract.
-
2 tablespoons (15 g) red velvet cake crumbs or chocolate shavings.
Pro Tips
1. Bring your ingredients to room temperature.
Cold cream cheese creates lumps that are difficult to remove once you start mixing. Let the cream cheese, eggs, and sour cream sit at room temperature for approximately 30–60 minutes before preparing the filling.
Softened cream cheese blends smoothly with the sugar, producing a silky texture. Room-temperature eggs also incorporate more easily, helping the batter maintain an even consistency.
2. Mix gently to avoid incorporating excess air.
A cheesecake should feel creamy and dense rather than fluffy. Beat the cream cheese and sugar until smooth, but avoid whipping the mixture excessively.
Add the eggs one at a time and mix on low speed. Once the batter looks uniform, stop mixing.
Too much air can cause the cheesecake to rise dramatically during baking and collapse as it cools. Gentle mixing helps prevent cracks and preserves that beautiful, smooth surface.
3. Bake slowly and cool gradually.
A water bath helps maintain a gentle, even baking temperature. Wrap the springform pan securely in foil before placing it inside a larger roasting pan.
Pour hot water into the roasting pan until it reaches approximately halfway up the cheesecake pan.
Bake until the edges look set but the center still jiggles slightly. Then turn off the oven, crack the door open, and let the cheesecake rest inside for about one hour.
This gradual cooling process helps prevent sudden temperature changes that can cause cracks.
Finally, refrigerate the cheesecake for at least six hours, preferably overnight, before slicing.
Instructions
Step 1: Prepare the oven and pan
Preheat your oven to 325°F (160°C).
Lightly grease a 9-inch springform pan. Line the bottom with parchment paper for easier removal.
Wrap the outside of the pan with two layers of heavy-duty aluminum foil if you plan to use a water bath. Make sure the foil extends high enough to protect the pan from water.
Step 2: Make the chocolate cookie crust
Place the chocolate cookies in a food processor and pulse until they form fine crumbs.
Transfer the crumbs to a mixing bowl. Add the melted butter and sugar, then stir until the mixture resembles damp sand.
Press the mixture firmly into the bottom of the prepared springform pan.
Use the bottom of a measuring cup to create an even layer, paying attention to the edges.
Bake the crust for 10 minutes. Remove it from the oven and let it cool while you prepare the filling.
Step 3: Prepare the cheesecake filling
Place the softened cream cheese in a large mixing bowl.
Beat on medium-low speed until smooth and creamy, scraping down the sides as needed.
Add the granulated sugar and cocoa powder. Mix until fully incorporated.
Add the sour cream, heavy cream, vanilla extract, red food coloring, vinegar, and cornstarch.
Mix gently until the batter develops an even red color.
Add the eggs one at a time, mixing on low speed after each addition.
Stop mixing as soon as the batter looks smooth.
Step 4: Fill the springform pan
Pour the cheesecake batter over the cooled chocolate crust.
Use a spatula to smooth the surface.
Gently tap the pan against the counter a few times to release any large air bubbles.
Place the wrapped springform pan inside a large roasting pan.
Carefully pour hot water into the roasting pan until it reaches halfway up the sides of the cheesecake pan.
Step 5: Bake the cheesecake
Place the roasting pan in the preheated oven.
Bake for approximately 65–80 minutes.
The edges should look set, while the center should still have a slight wobble when you gently shake the pan.
Avoid waiting until the entire cheesecake feels firm. It will continue to set as it cools.
Step 6: Cool gradually
Turn off the oven.
Open the oven door slightly and leave the cheesecake inside for approximately one hour.
Remove the cheesecake from the water bath and carefully remove the foil.
Let it cool completely at room temperature.
Once cool, cover the pan and refrigerate for at least six hours.
Overnight chilling produces the best texture and makes slicing much easier.
Step 7: Prepare the cream cheese topping
Beat the softened cream cheese and powdered sugar until smooth.
In a separate bowl, whip the heavy cream and vanilla until medium-stiff peaks form.
Gently fold the whipped cream into the cream cheese mixture.
Spread or pipe the topping over the chilled cheesecake.
Finish with red velvet cake crumbs, chocolate shavings, or a few decorative cream cheese swirls.
Step 8: Slice and serve
Run a thin knife around the inside edge of the springform pan.
Release the sides and carefully remove the cheesecake.
For clean slices, dip a sharp knife in warm water, wipe it dry, and cut through the cheesecake.
Repeat between slices.
Serve chilled and enjoy the creamy filling, chocolate crust, and beautiful red velvet finish.
Variations
1. Red Velvet Cheesecake Brownie
Replace the chocolate cookie crust with a layer of red velvet brownie batter.
Bake the brownie base until partially set, then add the cheesecake filling and continue baking.
This creates a delicious combination of fudgy brownie texture and creamy cheesecake.
2. Oreo Red Velvet Cheesecake
Use chocolate sandwich cookies for the crust and fold 1 cup (approximately 100 g) of chopped cookies into the cheesecake batter.
You can also sprinkle additional cookie pieces over the cream cheese topping.
This variation adds extra chocolate flavor and a delightful crunchy texture.
3. Gluten-Free Red Velvet Cheesecake
Choose certified gluten-free chocolate cookies for the crust.
Replace regular cornstarch only if your chosen product contains unwanted additives, and check every ingredient label carefully.
The cheesecake filling itself contains no wheat flour, making this adaptation straightforward.
For a lighter topping, use a thin layer of whipped cream instead of the cream cheese frosting.
Storage and Serving
Store leftover Red Velvet Cheesecake in an airtight container or cover the cheesecake tightly with plastic wrap.
Keep it refrigerated at 40°F (4°C) or below.
The cheesecake stays fresh for approximately 4–5 days when properly refrigerated.
For the best texture, keep the topping covered and avoid leaving slices at room temperature for more than two hours.
You can also freeze cheesecake for longer storage.
Freeze individual slices without the decorative topping, if possible. Wrap each slice tightly in plastic wrap, then place it in a freezer-safe container.
Freeze for up to two months for the best quality.
Thaw slices overnight in the refrigerator before serving.
Serving suggestions:
-
Serve with fresh strawberries or raspberries for a fruity contrast.
-
Add a drizzle of melted white chocolate for an elegant finish.
-
Pair with freshly brewed coffee, espresso, or a glass of cold milk.
For special occasions, arrange fresh berries around the cheesecake and add a few chocolate curls.
FAQs
1. Why did my cheesecake crack?
Overmixing, excessive baking, or sudden temperature changes can cause cracks. Mix gently, avoid overbaking, and cool the cheesecake gradually inside the oven.
2. Can I make this cheesecake without a water bath?
Yes. A water bath helps create gentle, even heat, but you can bake without one. Place a pan of hot water on the lower oven rack to add moisture, and monitor the cheesecake carefully.
3. How do I know when the cheesecake is done?
The edges should look set, while the center should jiggle slightly when you move the pan. The cheesecake will continue to firm up during cooling and refrigeration.
4. Can I prepare this cheesecake ahead of time?
Absolutely. Prepare it one day before serving and refrigerate overnight. Add the topping shortly before serving for the freshest appearance.
5. Can I use natural food coloring?
Yes. Natural red food coloring works, although the final color may appear less vibrant. Beetroot powder can also provide a reddish hue, but it may change the flavor slightly.
Conclusion
This Red Velvet Cheesecake is comfort food at its finest, combining a rich chocolate cookie crust, silky cream cheese filling, and a gorgeous red velvet finish. It’s the kind of dessert that transforms birthdays, holiday dinners, and special celebrations into unforgettable moments. Every slice delivers the perfect balance of creamy sweetness, subtle cocoa flavor, and irresistible texture. Whether you’re sharing it with family or preparing an elegant dessert for guests, this cheesecake offers bakery-style beauty without complicated techniques. Make it ahead, chill it overnight, and enjoy a spectacular homemade treat that everyone will remember.
Print
Red Velvet Cheesecake
- Total Time: 45
Description
Red Velvet Cheesecake is the ultimate dessert for anyone who loves creamy cheesecake and classic red velvet flavor. Make this stunning treat for your next celebration and watch every slice disappear.
Ingredients
-
2 cups (200 g) chocolate cookie crumbs
-
6 tablespoons (85 g) unsalted butter, melted
-
2 tablespoons (25 g) granulated sugar
-
24 oz (680 g) full-fat cream cheese, softened
-
1 cup (200 g) granulated sugar
-
3 large eggs, room temperature
-
1/2 cup (120 g) sour cream
-
1/4 cup (60 ml) heavy cream
-
2 tablespoons (10 g) unsweetened cocoa powder
-
1 tablespoon (15 ml) vanilla extract
-
1 tablespoon (15 ml) red food coloring
-
1 teaspoon (5 ml) white vinegar
-
1 tablespoon (8 g) cornstarch
-
1/2 cup (120 ml) heavy whipping cream
-
4 oz (115 g) cream cheese, softened
-
1/4 cup (30 g) powdered sugar
-
1 teaspoon (5 ml) vanilla extract
-
2 tablespoons (15 g) red velvet cake crumbs or chocolate shavings
Instructions
-
Preheat the oven to 325°F (160°C). Grease a 9-inch springform pan and line the bottom with parchment paper. Wrap the outside with foil if using a water bath.
-
Crush the chocolate cookies into fine crumbs. Mix with melted butter and sugar, press firmly into the pan, and bake for 10 minutes. Let cool.
-
Beat softened cream cheese until smooth. Add sugar and cocoa powder, then mix until combined.
-
Add sour cream, heavy cream, vanilla, red food coloring, vinegar, and cornstarch. Mix gently until smooth and evenly colored.
-
Add eggs one at a time, mixing on low speed just until incorporated.
-
Pour the filling over the crust and smooth the surface. Place the springform pan inside a roasting pan and add hot water halfway up the sides.
-
Bake for 65–80 minutes, until the edges set and the center jiggles slightly.
-
Turn off the oven, crack the door, and let the cheesecake cool inside for one hour. Remove from the water bath and cool completely.
-
Refrigerate for at least six hours or overnight.
-
Beat cream cheese and powdered sugar until smooth. Whip heavy cream with vanilla to medium-stiff peaks, then fold into the cream cheese mixture.
-
Spread or pipe the topping over the chilled cheesecake. Decorate with red velvet crumbs or chocolate shavings.
-
Slice with a warm, clean knife and serve chilled.
- Prep Time: 25
- Category: Baking
- Cuisine: amircain