
Introduction
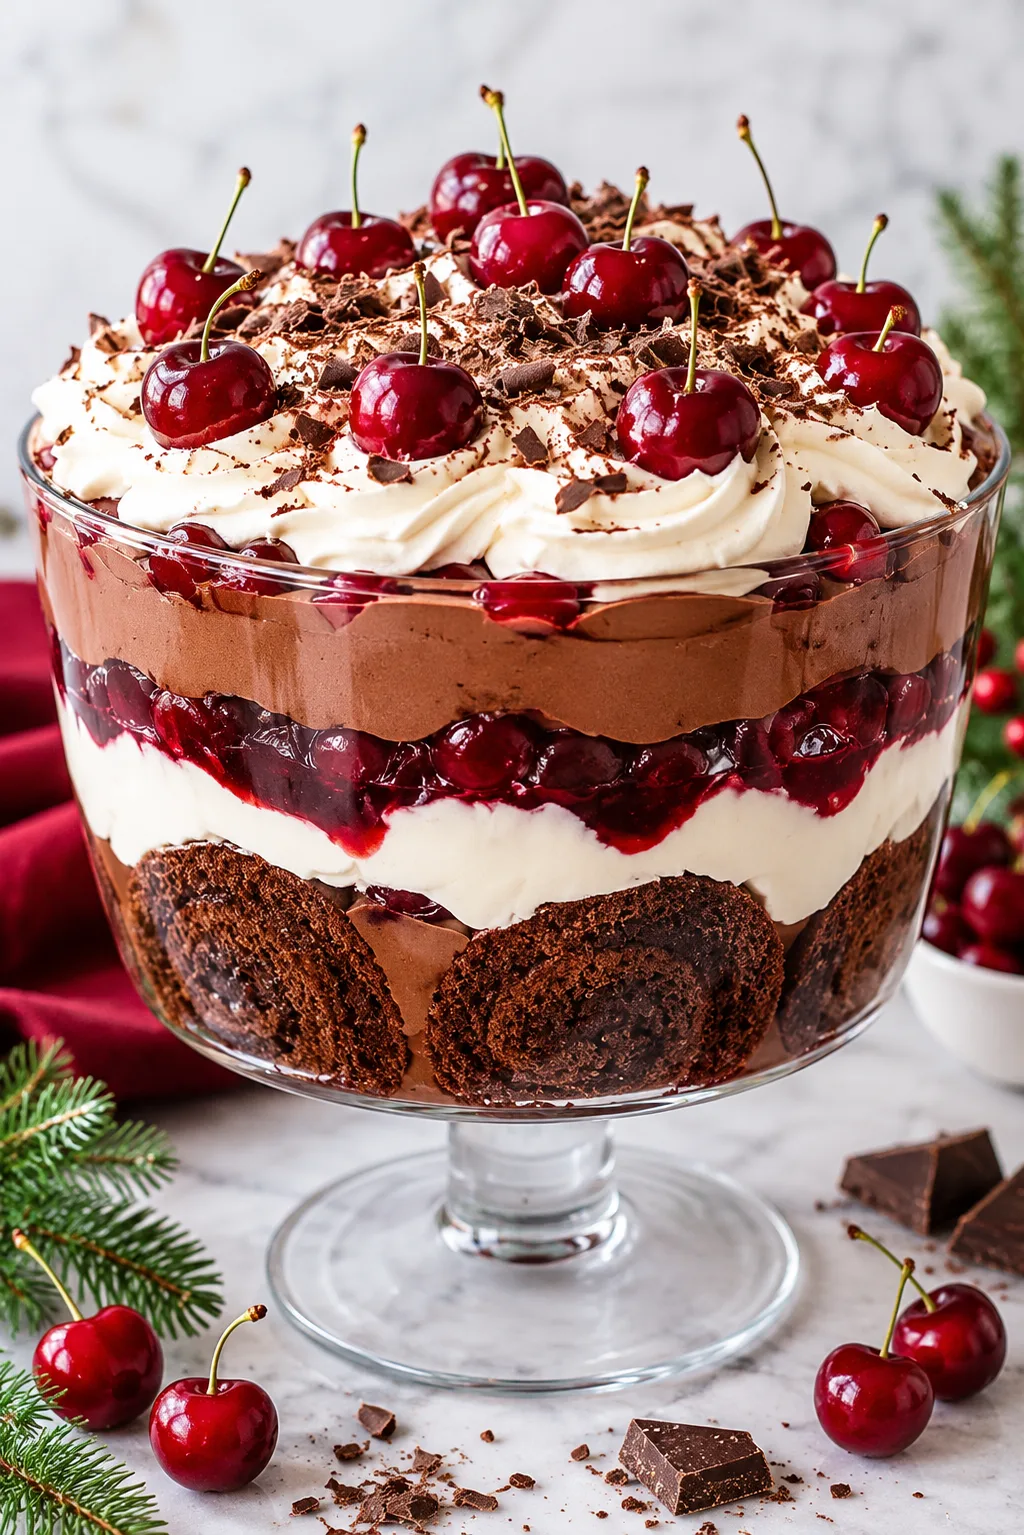
Rich, velvety chocolate cake, juicy cherries, fluffy whipped cream, and delicate chocolate shavings come together in this irresistible Black Forest Trifle. Inspired by the classic German Black Forest cake, this layered dessert transforms familiar flavors into a beautiful, crowd-pleasing treat. Every spoonful delivers a delicious combination of moist chocolate cake, sweet-tart cherries, and creamy goodness. Whether you’re preparing a holiday dessert, celebrating a birthday, or hosting a dinner party, this elegant trifle makes every occasion sweeter. You’ll learn… how to create this stunning dessert with simple ingredients and easy layering techniques.
Why You’ll Love This Recipe
There are plenty of reasons to make this Black Forest Trifle your next favorite dessert. First, it combines three irresistible flavors: deep chocolate, bright cherries, and lightly sweetened whipped cream. Together, they create the perfect balance of richness and freshness.
The textures make every bite special, too. Soft chocolate cake absorbs some of the cherry juices, while the creamy filling adds a smooth, airy contrast. Fresh cherries bring a juicy pop, and chocolate shavings provide a delicate finishing touch.
Another reason to love this recipe is how easy it is to assemble. You don’t need professional decorating skills or complicated baking techniques. Simply prepare the components, layer everything in a glass bowl, and let the beautiful colors shine.
It’s also an excellent make-ahead dessert. Prepare it before your guests arrive, chill it, and bring it straight to the table. The gorgeous layers look impressive without requiring extra effort.
Ingredients
You’ll need a handful of simple ingredients to create this delicious dessert. For approximately 10–12 servings, gather the following:
-
1 chocolate cake (approximately 9 inches or 23 cm): Homemade or store-bought chocolate cake works beautifully.
-
2 cups (300 g) pitted cherries: Fresh or frozen cherries provide a fruity, slightly tart flavor.
-
1/3 cup (65 g) granulated sugar: Sweetens the cherry filling.
-
1 tablespoon (15 ml) lemon juice: Brightens the cherry flavor.
-
1 tablespoon (8 g) cornstarch: Thickens the cherry sauce.
-
2 tablespoons (30 ml) water: Helps dissolve the cornstarch.
-
2 cups (480 ml) heavy whipping cream: Creates a light, fluffy topping.
-
1/3 cup (40 g) powdered sugar: Sweetens the whipped cream.
-
1 teaspoon (5 ml) vanilla extract: Adds warmth and aroma.
-
1/2 cup (85 g) dark chocolate shavings: Provides a rich chocolate finish.
-
1/4 cup (60 ml) cherry juice: Adds moisture and enhances the cherry flavor.
Pro Tips
A few simple techniques will help you create a beautiful, flavorful Black Forest Trifle with perfectly defined layers.
1. Let the cherry filling cool completely.
Cook the cherries with sugar and lemon juice until they release their juices. Add the cornstarch mixture and simmer until thickened. Allow the filling to cool before assembling. Warm cherries can melt the whipped cream and make the layers messy.
2. Whip the cream to the right consistency.
Use cold heavy whipping cream and a chilled mixing bowl. Beat the cream with powdered sugar and vanilla until medium-stiff peaks form. Stop as soon as the cream holds its shape. Overwhipping can create a grainy texture.
3. Build neat, balanced layers.
Cut the chocolate cake into bite-sized cubes of similar size. Arrange them evenly in your serving bowl, then add cherry filling and whipped cream. Repeat the layers without pressing them down too firmly.
For the prettiest presentation, use a clear glass trifle bowl so everyone can admire the chocolate, red cherry, and white cream layers.
Step-by-Step Instructions
Making this dessert is easier than it looks. Follow these simple steps to create beautiful layers and delicious flavor in every spoonful.
Step 1: Prepare the Chocolate Cake
If you’re baking your cake from scratch, allow it to cool completely before assembling the dessert. You can also use your favorite boxed chocolate cake mix or a good-quality store-bought cake.
Cut the cake into bite-sized cubes, approximately 1-inch (2.5 cm) pieces. Keep the pieces relatively even so they create neat layers in your serving dish.
If the cake feels slightly dry, don’t worry. A little cherry juice will add moisture and help bring the flavors together.
Step 2: Make the Cherry Filling
Add the pitted cherries, granulated sugar, and lemon juice to a medium saucepan.
Cook over medium heat for approximately 5–7 minutes, stirring occasionally. The cherries will soften and release their juices.
In a small bowl, whisk the cornstarch with water until smooth. Pour this mixture into the saucepan and stir continuously.
Cook for another 1–2 minutes until the cherry mixture thickens into a glossy sauce.
Remove the saucepan from the heat and let the filling cool completely. If you prefer a chunkier texture, avoid crushing the cherries while stirring.
Step 3: Whip the Cream
Pour the cold heavy whipping cream into a large mixing bowl.
Add the powdered sugar and vanilla extract. Using an electric mixer, beat on medium-high speed until medium-stiff peaks form.
The cream should look fluffy and hold its shape when you lift the beaters.
Keep the whipped cream refrigerated until you’re ready to assemble the trifle.
Step 4: Prepare the Serving Bowl
Choose a large, clear glass trifle bowl or individual dessert glasses.
Arrange a layer of chocolate cake cubes across the bottom. Drizzle a little cherry juice over the cake to add moisture and deepen the flavor.
Avoid soaking the cake completely. You want tender pieces that hold their shape rather than a mushy base.
Step 5: Add the Cherry Layer
Spoon half of the cooled cherry filling over the chocolate cake.
Spread it gently so the cherries and sauce cover the cake evenly. Make sure some cherry pieces remain visible along the sides of the glass bowl.
This layer brings a fruity contrast to the rich chocolate base.
Step 6: Add the Whipped Cream
Spread or pipe a generous layer of whipped cream over the cherries.
Use the back of a spoon to smooth the surface, or transfer the cream into a piping bag for a more decorative appearance.
Don’t press too firmly because you want the whipped cream to remain light and airy.
Step 7: Repeat the Layers
Add another layer of chocolate cake cubes, followed by the remaining cherry filling and another generous layer of whipped cream.
Continue arranging the ingredients until you’ve used everything.
For a particularly attractive finish, make sure the final layer consists of whipped cream.
Step 8: Decorate and Chill
Finish with dark chocolate shavings scattered generously over the whipped cream.
Add a few fresh cherries on top for a beautiful finishing touch.
Cover the bowl and refrigerate for at least 2–4 hours before serving. This resting time allows the flavors to blend while the cake absorbs some of the cherry juices.
Serve chilled and enjoy every creamy, chocolatey spoonful!
Variations
One of the best things about this recipe is how easily you can customize it.
1. Black Forest Brownie Trifle
Replace the chocolate cake with fudgy brownies. Their dense, chewy texture creates an extra-rich dessert that pairs wonderfully with cherries and whipped cream.
2. Individual Black Forest Trifles
Instead of using one large bowl, assemble the dessert in small glasses or mason jars. Individual portions look elegant at dinner parties and make serving effortless.
3. Lighter Black Forest Trifle
For a lighter option, replace some of the heavy whipped cream with Greek yogurt or a lightly sweetened yogurt mixture. You can also reduce the sugar in the cherry filling to suit your taste.
You can even experiment with milk chocolate curls, white chocolate shavings, or a mixture of fresh berries for a different finishing touch.
Storage and Serving
Store leftover Black Forest Trifle in an airtight container or cover the serving bowl tightly with plastic wrap. Keep it refrigerated and enjoy it within 2–3 days for the best texture and flavor.
The chocolate cake gradually absorbs moisture from the cherries and cream, making the layers softer as the dessert sits. For this reason, it’s best to enjoy it while the cream remains fluffy and the cake still holds its shape.
Avoid freezing the assembled trifle because whipped cream can lose its smooth texture after thawing.
Serving suggestions:
-
Holiday dinners: Serve chilled after Christmas dinner or a festive family gathering.
-
Birthday celebrations: Add extra chocolate curls and fresh cherries for a beautiful celebration dessert.
-
Dinner parties: Prepare individual portions in elegant glasses for a sophisticated presentation.
For an extra-special touch, serve each portion with a few fresh cherries and additional chocolate shavings.
Frequently Asked Questions
1. Can I make Black Forest Trifle ahead of time?
Yes! You can assemble it several hours ahead or the night before serving. Keep it covered in the refrigerator until you’re ready to enjoy it.
2. Can I use canned cherries?
Absolutely. Drain canned cherries before using them and reserve some of the juice for soaking the cake. Adjust the sugar depending on whether the cherries come packed in syrup or juice.
3. Can I use frozen cherries?
Yes. Thaw them first and drain excess liquid if necessary. Frozen cherries work particularly well in the cooked filling.
4. What kind of chocolate cake works best?
A moist chocolate sponge cake works beautifully. You can also use chocolate fudge cake or brownies if you prefer a richer, denser dessert.
5. How do I keep the whipped cream from becoming runny?
Start with very cold heavy whipping cream, chill your mixing bowl, and whip until medium-stiff peaks form. Keep the assembled dessert refrigerated until serving.
This Black Forest Trifle is comfort food at its finest, combining rich chocolate cake, juicy cherries, and clouds of sweet whipped cream in one irresistible dessert. It’s the kind of dish that turns an ordinary family dinner into a special occasion. With its gorgeous layers, classic flavors, and simple preparation, this recipe deserves a place on your holiday dessert table. Prepare it ahead, add plenty of chocolate shavings, and get ready for everyone to ask for another spoonful!
Print
Black Forest Trifle
- Total Time: 45
Description
Bring a little chocolate magic to your dessert table with this gorgeous Black Forest Trifle! Layers of rich chocolate cake, juicy cherries, and fluffy whipped cream make every spoonful unforgettable.
Ingredients
-
1 chocolate cake (approximately 9 inches or 23 cm)
-
2 cups (300 g) pitted cherries, fresh or frozen
-
1/3 cup (65 g) granulated sugar
-
1 tablespoon (15 ml) lemon juice
-
1 tablespoon (8 g) cornstarch
-
2 tablespoons (30 ml) water
-
2 cups (480 ml) heavy whipping cream
-
1/3 cup (40 g) powdered sugar
-
1 teaspoon (5 ml) vanilla extract
-
1/2 cup (85 g) dark chocolate shavings
-
1/4 cup (60 ml) cherry juice
Instructions
-
Bake the chocolate cake if necessary and allow it to cool completely. Cut into bite-sized cubes.
-
Combine the cherries, granulated sugar, and lemon juice in a saucepan. Cook over medium heat for 5–7 minutes.
-
Mix the cornstarch with water until smooth. Add to the cherries and cook for another 1–2 minutes until thickened. Cool completely.
-
Beat the heavy whipping cream with powdered sugar and vanilla extract until medium-stiff peaks form.
-
Arrange half of the chocolate cake cubes in the bottom of a large glass trifle bowl.
-
Drizzle some cherry juice over the cake.
-
Spread half of the cooled cherry filling over the cake.
-
Add a generous layer of whipped cream.
-
Repeat with the remaining chocolate cake, cherry filling, and whipped cream.
-
Decorate with dark chocolate shavings and fresh cherries if desired.
-
Cover and refrigerate for 2–4 hours before serving.
-
Serve chilled and enjoy!
- Prep Time: 25
- Category: Baking
- Cuisine: amircain