
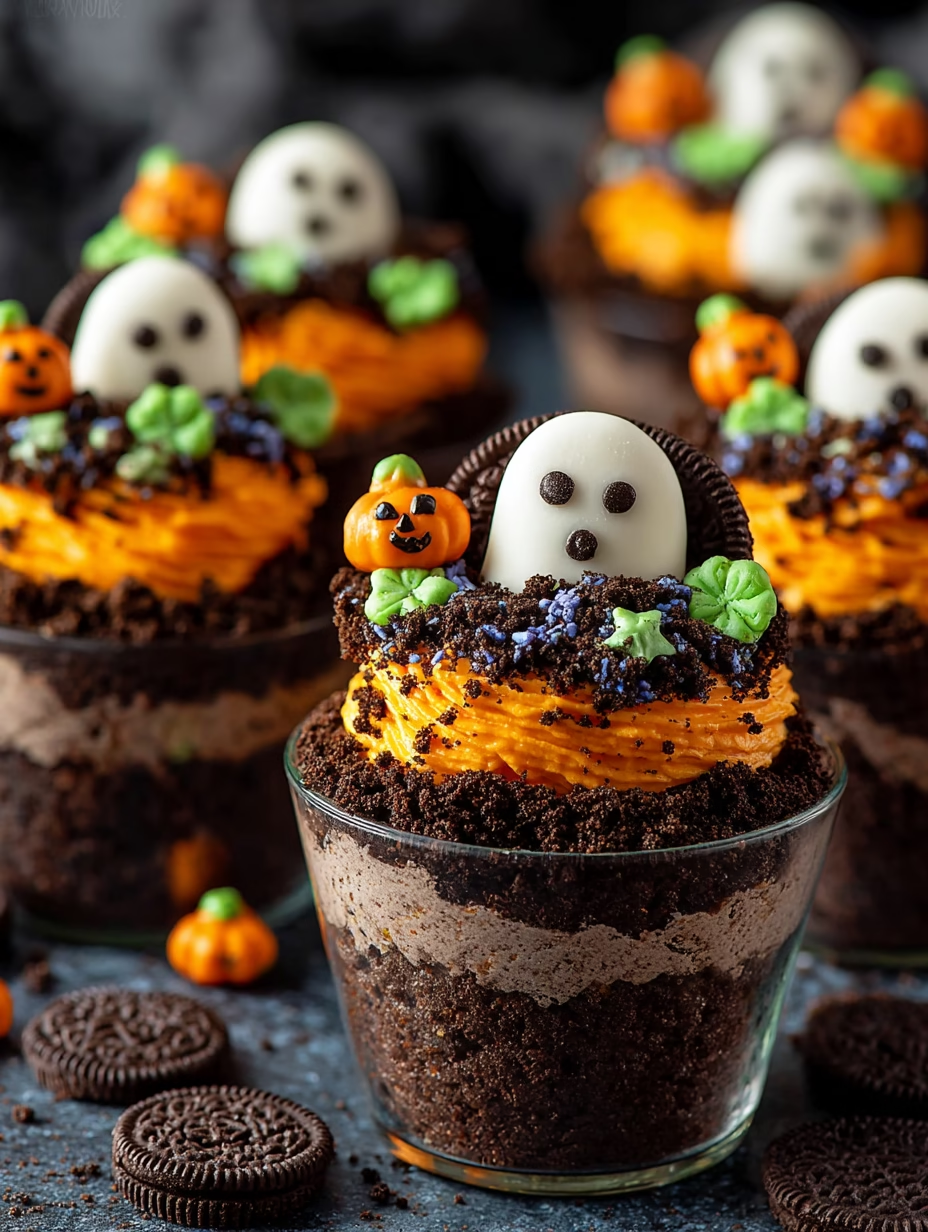
Halloween is the perfect time to let your creativity run wild in the kitchen, and Easy Halloween Dirt Cupcakes are the ultimate treat to impress kids and adults alike. These chocolatey, creepy, and delightfully messy desserts capture the essence of Halloween with layers of rich chocolate pudding, crushed Oreos resembling dirt, and gummy worms peeking out like mini monsters. Whether for a spooky party, a classroom treat, or a family dessert night, these cupcakes combine simplicity, flavor, and fun in a single bite.
Imagine the joy on little faces as they dig into the soft chocolate base, encounter the crunchy Oreo “soil,” and discover gummy worms crawling from the dirt—this is more than a cupcake; it’s an experience. Plus, making them is surprisingly easy, which means more time enjoying Halloween festivities rather than spending hours in the kitchen.
Why You’ll Love These Easy Halloween Dirt Cupcakes
-
Fearless flavor explosion: Chocolate cupcakes and pudding create a rich, indulgent taste.
-
Quick and simple preparation: Ready in under 45 minutes.
-
Kid-approved fun: Gummy worms make every bite a playful surprise.
-
Customizable decorations: Add sprinkles, tinted frosting, or edible eyes for extra flair.
-
Budget-friendly dessert: Pantry staples and affordable toppings.
-
Versatile serving: Perfect for parties, bake sales, or family nights.
-
Allergy-friendly options: Easily adapted to gluten-free, dairy-free, or sugar-free diets.
Ingredients for Easy Halloween Dirt Cupcakes
To create these spook-tacular treats, gather the following:
Basic Ingredients
-
Chocolate cupcakes (store-bought or homemade)
-
Chocolate pudding mix (instant or cooked)
-
Milk (for pudding preparation)
-
Oreos, crushed (to resemble dirt)
-
Gummy worms (for decoration)
Optional Ingredients
-
Vanilla frosting (for extra sweetness and texture)
-
Green food coloring (to tint frosting for a “grass” effect)
-
Halloween-themed sprinkles
Substitutions
-
Gluten-free cupcakes: Use gluten-free cake mix or a homemade recipe.
-
Dairy-free: Substitute milk with almond, oat, or coconut milk, and use dairy-free pudding.
-
Sugar-free: Choose sugar-free pudding and cupcakes for dietary needs.
Pro tip: Use high-quality chocolate in the pudding and cupcakes for a richer, more decadent flavor.
Step-by-Step Instructions
1. Preheat & Prepare Pan
Preheat your oven to 375°F (190°C). Grease a 12-cup muffin tin or line with paper liners. Ensuring a well-prepared pan prevents sticking and preserves the cupcake shape.
2. Mix Dry Ingredients
In a large bowl, whisk together flour, granulated sugar, baking powder, and a pinch of salt. Uniformly combining dry ingredients ensures even rising and a consistent texture.
3. Combine Wet Ingredients
In a separate bowl, mix milk, vegetable oil, eggs, and vanilla extract until smooth. This step helps incorporate fat and moisture, resulting in soft, fluffy cupcakes.
4. Assemble the Batter
Pour the wet ingredients into the dry mixture and stir gently until just combined. Avoid overmixing to prevent dense cupcakes. For a fruity twist, fold in a handful of cherries or chocolate chips.
5. Bake
Spoon the batter into muffin cups, filling each about two-thirds full. Bake for 20–25 minutes or until a toothpick inserted in the center comes out clean. Allow them to cool completely before decorating.
6. Prepare the “Dirt” Layer
Crush Oreos into fine crumbs. You can pulse them in a food processor or place them in a bag and crush with a rolling pin. Mix lightly with optional sprinkles for extra Halloween flair.
7. Assemble the Cupcakes
Spread a layer of chocolate pudding over each cupcake. Sprinkle generously with Oreo crumbs to mimic dirt. Position gummy worms to peek out from the “soil.” For added effect, pipe green-tinted frosting around the edges for a grassy appearance.
8. Serve & Enjoy
These cupcakes can be served immediately or chilled for a firmer pudding layer. Watch the excitement as kids uncover the hidden gummy worms—they’re as fun to make as they are to eat.
Pro Tips for Perfect Easy Halloween Dirt Cupcakes
How Do I Make These Cupcakes Extra Moist?
Use milk or sour cream in the batter. The fat content helps retain moisture, ensuring the cupcakes stay soft even after a few days.
Can I Make Them Ahead of Time?
Yes! Bake the cupcakes a day in advance, store in an airtight container, and assemble the dirt and gummy worms the day of the party.
How Do I Prevent Pudding from Sinking?
Chill the pudding slightly before spreading over the cupcakes. This prevents it from running into the cupcake and maintains a clean “dirt” layer.
Can I Substitute Gummy Worms?
Absolutely. Small candy bugs, chocolate sticks, or licorice pieces also work well for a creepy effect.
What’s the Best Way to Crush Oreos?
For consistent “dirt,” pulse in a food processor or place in a resealable bag and gently crush with a rolling pin until fine crumbs form.
Best Ways to Serve Easy Halloween Dirt Cupcakes
-
Halloween party centerpiece: Arrange cupcakes on a tray with extra Oreos and candy worms.
-
Classroom treats: Individually wrap in mini cellophane bags for safe sharing.
-
Dessert buffet: Pair with Halloween-themed drinks, like pumpkin spice latte or black cocoa milkshakes.
-
Creative plating: Serve on a small plate with edible “rocks” made of chocolate or candy.
For more Halloween treats, see: Creepy Halloween Dirt Cupcakes and Halloween Dirt Dessert Cupcakes.
Nutrition Information (Per Cupcake)
-
Calories: 220 kcal
-
Fat: 10g
-
Saturated Fat: 5g
-
Carbohydrates: 30g
-
Sugars: 18g
-
Protein: 3g
-
Fiber: 1g
Storage & Leftovers
-
Room temperature: Store cupcakes in an airtight container for up to 2 days.
-
Refrigeration: Keep assembled cupcakes in the fridge for up to 4 days. Cover loosely to prevent moisture from softening the Oreo “dirt.”
-
Freezing: Bake and cool cupcakes, freeze unassembled, and add pudding, Oreos, and gummy worms after thawing.
Frequently Asked Questions (FAQs)
Can I Make These Cupcakes Gluten-Free?
Yes! Swap the cupcake base with a gluten-free cake mix or homemade recipe. The pudding and Oreo topping can also be substituted with gluten-free alternatives.
Are Easy Halloween Dirt Cupcakes Vegan?
They can be adapted. Use plant-based milk, vegan chocolate pudding, and egg replacers like flax eggs or applesauce in the cupcake batter.
Can I Use Homemade Pudding Instead of Instant?
Absolutely! Homemade chocolate pudding enhances flavor and allows you to control sugar levels.
How Long Will They Last?
Assembled cupcakes are best eaten within 2–4 days for optimal texture and taste. Unassembled cupcakes can be stored for up to a week in the refrigerator.
Can I Make Mini Versions?
Yes! Use mini cupcake tins and reduce baking time by 5–7 minutes. These bite-sized treats are perfect for parties and snacks.
Variations of Easy Halloween Dirt Cupcakes
-
Spooky Dirt Cupcakes with Eyeballs: Add candy eyes on top for a fun effect.
-
Halloween Dirt-Themed Cupcakes: Mix in crushed cookies and edible Halloween decorations.
-
Chocolate Halloween Dirt Cupcakes: Use double chocolate cupcakes for an even richer experience.
-
Dairy-Free Dirt Cupcakes: Substitute milk with almond or oat milk and use vegan pudding.
-
Sugar-Free Dirt Cupcakes: Use sugar-free cupcakes, pudding, and chocolate for a healthier twist.
Conclusion
Creating Easy Halloween Dirt Cupcakes is a perfect way to celebrate Halloween with delicious, playful, and visually striking treats. These cupcakes offer a sensory experience, combining chocolatey richness, crunchy “dirt,” and playful gummy worms in every bite.