
Introduction
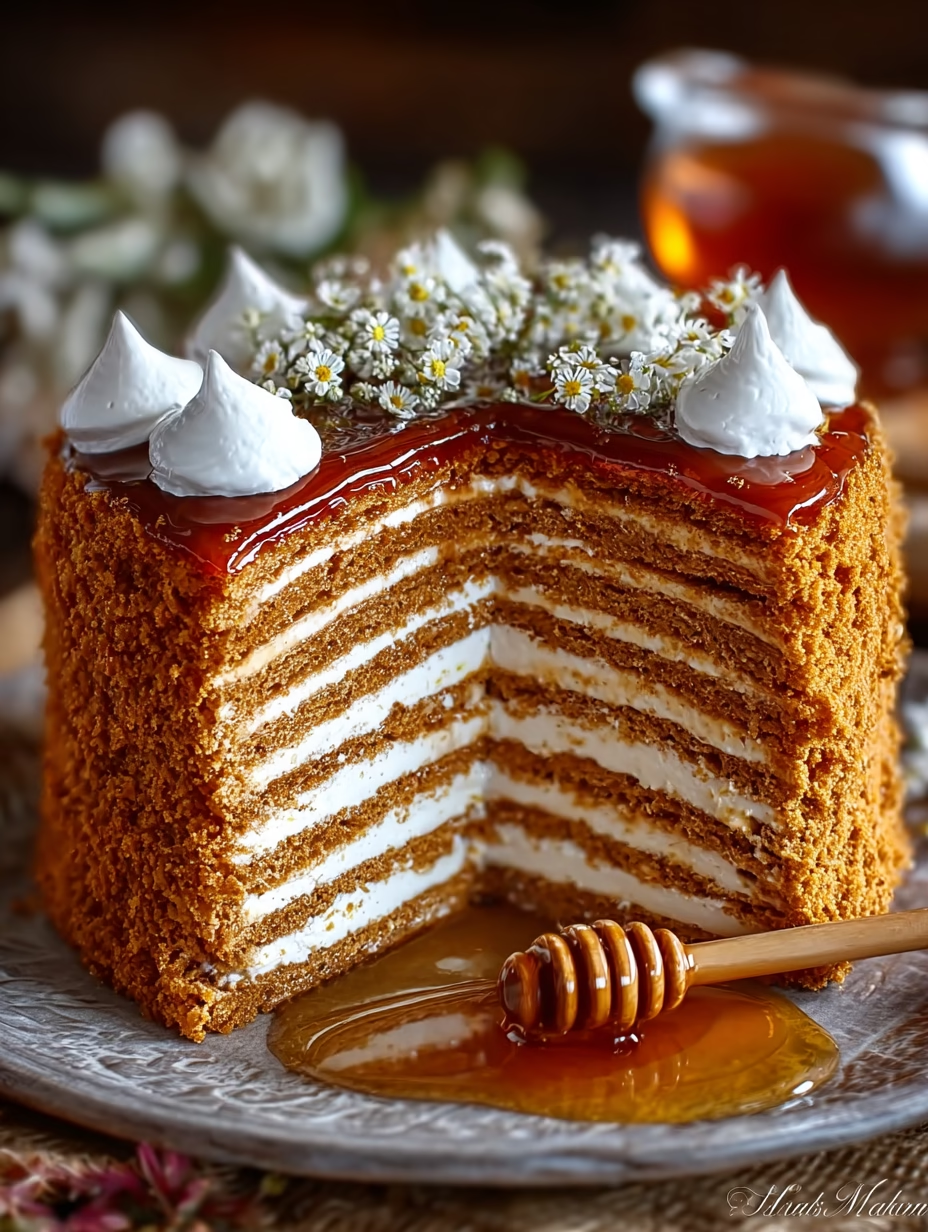
Traditional Russian Honey Cake Recipe With Creamy Layers is one of those legendary desserts that instantly makes you feel at home, no matter where you are. Known as Medovik in Russia, this cake has been passed down through generations, carrying with it both history and irresistible flavor. Imagine soft honey-infused sponge layers stacked high with tangy, creamy filling—each bite melting into a symphony of sweetness and light tartness.
This cake is not just a dessert; it’s an experience. Whether you’re baking for a festive holiday, a birthday, or simply to impress family and friends, the Russian Honey Cake with Creamy Layers delivers comfort, nostalgia, and elegance in one. In this article, you’ll learn everything from the authentic step-by-step process to expert tips, storage tricks, and exciting variations to master this classic.
Why You’ll Love This Cake
-
Rich and Elegant Flavor – The deep sweetness of honey balances perfectly with the tang of sour cream.
-
Soft and Creamy Texture – Each layer soaks up the filling, creating a melt-in-your-mouth experience.
-
Timeless Tradition – A dessert rooted in Russian culinary history that connects you to culture.
-
Customizable – Easily adjust flavors, fillings, and toppings to fit your taste.
-
Crowd-Pleaser – Tall, layered, and visually stunning—a centerpiece for any table.
-
Budget-Friendly – Made with everyday ingredients like flour, honey, sugar, and sour cream.
-
Make-Ahead Friendly – Gets even better after resting overnight as flavors deepen.
-
Healthier Options Available – Swap with whole wheat flour, Greek yogurt, or natural sweeteners.
Ingredients
To make this authentic Russian honey cake with creamy layers, gather these ingredients:
For the Cake Layers:
-
3 cups all-purpose flour – Provides the structure. Can substitute with whole wheat flour.
-
1 cup honey – The star flavor. Wildflower honey gives a floral depth, while clover honey adds sweetness.
-
1 cup granulated sugar – Adds balance; brown sugar creates a deeper, caramel-like tone.
-
1/2 cup unsalted butter – Room temperature for smooth mixing; coconut oil works as a dairy-free option.
-
3 large eggs – Essential for binding and structure. Flaxseed meal + water is a vegan-friendly swap.
-
1 teaspoon baking soda – Helps the cake rise gently without heaviness.
-
1 teaspoon vanilla extract – Rounds out the honey’s floral notes.
For the Cream Filling:
-
2 cups sour cream – Creamy, tangy base. Greek yogurt can lighten it up.
-
1 cup powdered sugar – Adjust to taste; less for tangier cream, more for sweetness.
-
1 teaspoon vanilla extract – Adds warmth to the filling.
Optional Garnishes:
-
Chopped walnuts, almonds, or hazelnuts for crunch
-
Fresh berries (raspberries, strawberries, or blueberries) for color and freshness
-
A drizzle of honey for a glossy finish
Step-by-Step Instructions
1. Prepare the Honey Mixture
In a saucepan, gently melt the butter, sugar, and honey together over low heat. Stir until combined and aromatic, then remove from heat. Whisk in the baking soda—it will foam lightly, giving the cake its delicate texture.
2. Mix the Dough
Once slightly cooled, add eggs one at a time, whisking quickly to avoid curdling. Stir in vanilla extract. Gradually sift in flour, mixing until a soft dough forms. It should be pliable, not sticky.
3. Roll and Bake the Layers
Divide the dough into 6–8 equal portions. Roll each portion thinly (about 1/8 inch) into a round on parchment paper. Bake each layer at 350°F (175°C) for 5–7 minutes, until golden brown. Repeat until all layers are baked.
Pro Tip: Trim edges while still warm for uniform rounds, then save trimmings for garnish crumbs.
4. Prepare the Cream Filling
Whisk together sour cream, powdered sugar, and vanilla until smooth and slightly thickened. Taste and adjust sweetness.
5. Assemble the Cake
Layer the cake rounds with generous spoonfuls of cream filling. Spread evenly, letting the cream soak into each layer. Stack until all layers are used.
6. Decorate
Cover the entire cake with remaining cream. Crumble baked trimmings and sprinkle on top for a rustic finish. Add nuts, berries, or honey drizzle if desired.
7. Rest and Serve
Refrigerate for at least 6 hours—or overnight—for best results. This allows the cake to soften and absorb the cream fully. Slice and enjoy your Traditional Russian Honey Cake Recipe With Creamy Layers at its peak.
Pro Tips & Expert Answers
How long does Russian Honey Cake last?
Properly stored in the refrigerator, it lasts up to 5 days. The flavors deepen over time, making day 2 or 3 even better.
Can I make Medovik ahead of time?
Yes! It’s actually recommended to prepare this cake the day before serving so it sets and develops richer flavor.
What’s the best substitute for sour cream in the filling?
Greek yogurt is the closest option, offering a lighter texture and tang. For dairy-free, use coconut cream.
Best Ways to Serve
-
With hot tea or coffee, just like in traditional Russian households.
-
Paired with fresh fruit platters for balance.
-
Alongside other Eastern European desserts like Napoleon Cake or Vareniki with Sweet Cheese (linking opportunities).
-
As a festive centerpiece during Christmas or New Year celebrations.
Nutrition Information (Per Serving, 1/12 of Cake)
-
Calories: ~360
-
Protein: 5g
-
Fat: 14g
-
Carbs: 54g
-
Sugar: 32g
-
Fiber: 1g
Storage & Leftovers
-
Refrigerator: Store covered for up to 5 days.
-
Freezer: Wrap slices individually and freeze for up to 2 months. Thaw overnight in the fridge before serving.
-
Reheating: Not recommended—serve chilled or at room temperature.
Frequently Asked Questions
Can I make this cake gluten-free?
Yes, substitute with a 1:1 gluten-free flour blend.
Is Traditional Russian Honey Cake difficult to make?
It requires patience with rolling and layering, but the steps are straightforward.
Can I reduce the sugar?
Yes, you can reduce sugar in both the layers and cream filling without compromising too much on texture.
Variations
-
Chocolate Honey Cake – Add cocoa powder to the layers for a mocha twist.
-
Fruit-Filled Medovik – Spread thin layers of jam (apricot or berry) between cream.
-
Nutty Medovik – Incorporate chopped nuts between layers for crunch.
-
Modern Medovik with Mascarpone – Blend sour cream with mascarpone cheese for a richer filling.
-
Mini Honey Cakes – Bake smaller discs and stack as individual servings.
Conclusion
The Traditional Russian Honey Cake Recipe With Creamy Layers is more than dessert—it’s tradition, elegance, and comfort in one. With its golden honey layers and luscious cream filling, this cake has earned its place as one of the most beloved Russian desserts. Whether you follow the authentic version or try one of the variations, the result is always a show-stopper that brings smiles to every table.