
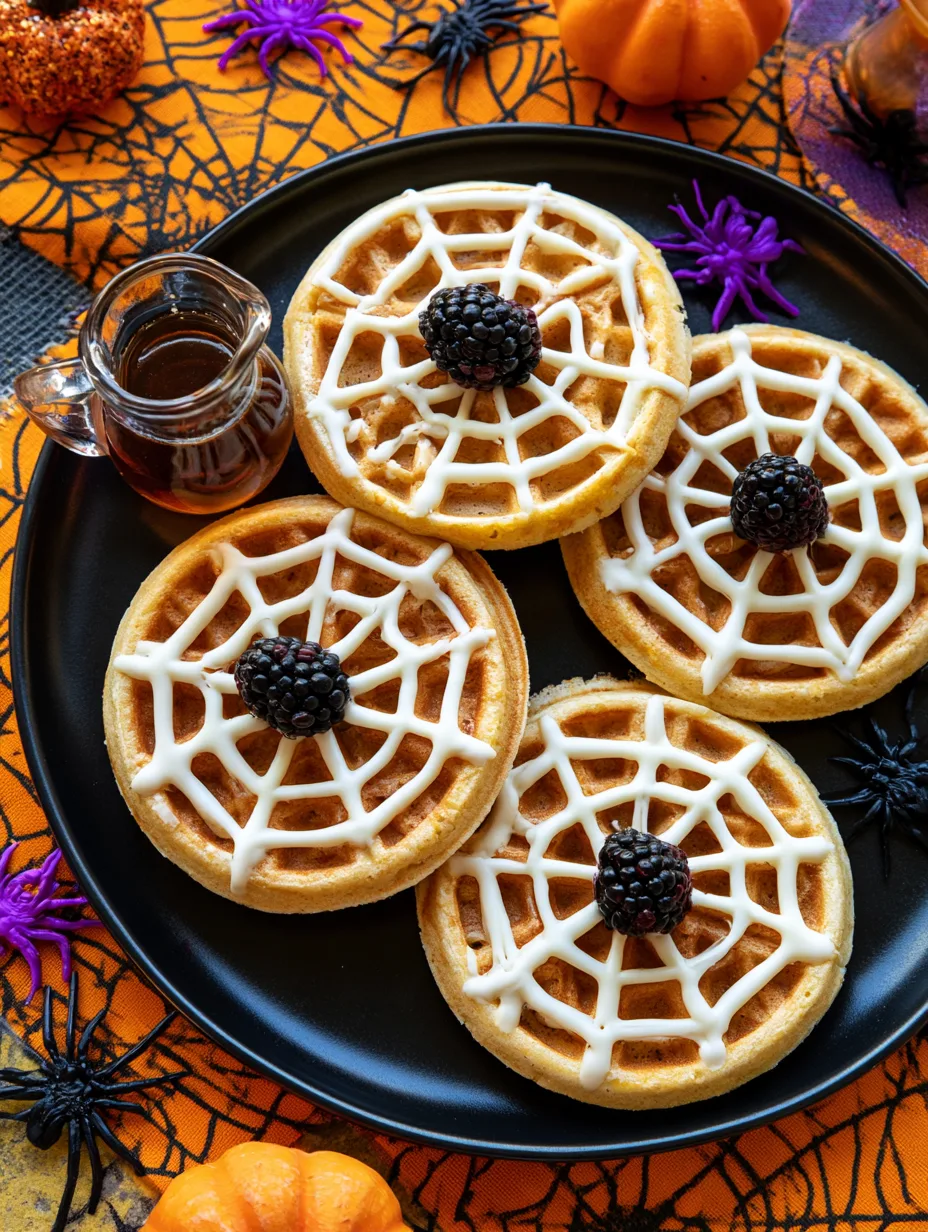
Crispy at the edges, tender in the center, and wonderfully playful, Spiderweb waffles review brings a festive twist to an everyday breakfast favorite. These waffles turn an ordinary morning into something special with their delicate web-like shape, golden color, and cozy homemade flavor. They work beautifully for Halloween breakfasts, fall brunches, parties, or simply a fun weekend treat. The best part is how easy they are to customize with toppings and sauces. You’ll learn how to make, serve, customize, and enjoy these charming waffles with confidence.
Why You’ll Love This Recipe
These spiderweb waffles combine everything you want from a homemade waffle with a fun seasonal presentation. The outside develops a lightly crisp texture while the inside stays soft, fluffy, and pleasantly tender. That contrast makes every bite satisfying.
The web shape instantly adds personality to the plate. Kids usually love the spooky design, while adults can dress it up with powdered sugar, berries, whipped cream, chocolate drizzle, or warm maple syrup.
Another reason this recipe stands out is its flexibility. You can prepare the batter from scratch, adjust the sweetness, or add warming spices for a fall-inspired flavor. The batter also works well for casual breakfasts because you do not need complicated ingredients or advanced cooking skills.
A reliable waffle maker or spiderweb-style waffle iron does most of the work. Once the batter hits the hot surface, you simply cook until golden and crisp.
For Halloween parties, brunch gatherings, or cozy autumn mornings, these waffles offer a delicious combination of visual appeal, texture, and convenience.
Ingredients
For about 6 spiderweb waffles, gather:
- 2 cups (240 g) all-purpose flour, the sturdy base for fluffy waffles
- 2 tbsp (25 g) granulated sugar, for gentle sweetness
- 1 tbsp (12 g) baking powder, to create lift
- 1/2 tsp (3 g) salt, to balance the flavors
- 2 large eggs, preferably room temperature
- 1 3/4 cups (420 ml) whole milk, for a tender batter
- 1/2 cup (113 g) unsalted butter, melted and slightly cooled
- 1 tsp (5 ml) vanilla extract, for warm aroma
- 1/2 tsp ground cinnamon, optional for fall flavor
- Cooking spray or additional melted butter, for the waffle iron
For serving, prepare maple syrup, powdered sugar, whipped cream, fresh berries, chocolate sauce, or your favorite toppings.
Pro Tips
First, avoid overmixing the batter. Stir just until the dry ingredients disappear. A few small lumps are completely fine. Overmixing develops too much gluten, which can make your waffles dense instead of fluffy.
Second, preheat your waffle iron thoroughly. A properly heated surface helps the batter spread and cook evenly while creating those desirable crisp edges. If the iron needs a light coating of oil, apply it before the first batch.
Third, watch the batter quantity. Spiderweb designs need enough batter to fill the pattern without overflowing into the surrounding edges. Start with a smaller amount and adjust according to your specific waffle maker.
For especially crisp waffles, place finished waffles directly on a wire rack instead of stacking them. Stacking traps steam and softens the exterior.
Finally, keep cooked waffles warm in a low oven if you are preparing several batches. This approach preserves their texture better than leaving them on a plate at room temperature.
Step-by-Step Instructions
Step 1: Prepare the dry ingredients.
Add the flour, sugar, baking powder, salt, and cinnamon to a large mixing bowl. Whisk everything together so the baking powder distributes evenly throughout the flour.
Step 2: Combine the wet ingredients.
In a separate bowl, whisk the eggs, milk, melted butter, and vanilla extract. Make sure the butter has cooled slightly before adding it so it does not scramble the eggs.
Step 3: Make the batter.
Pour the wet mixture into the dry ingredients. Stir gently with a whisk or spatula until combined. Stop mixing as soon as the batter looks smooth enough. Do not worry about a few small lumps.
Step 4: Preheat the waffle maker.
Heat your spiderweb waffle iron according to the manufacturer’s instructions. Give it enough time to become fully hot. Lightly grease the plates if necessary.
Step 5: Add the batter.
Pour a modest amount of batter into the center of the waffle pattern. Spread it gently if your waffle maker requires it, but avoid filling the plates too heavily. The batter expands as it cooks.
Step 6: Cook until golden.
Close the waffle maker and cook according to its instructions, usually until the waffle becomes golden brown and releases easily. Resist opening the iron repeatedly because this can interfere with even cooking.
Step 7: Check the texture.
Look for crisp, golden edges and a cooked center. If the waffle appears pale or soft, give it another short minute.
Step 8: Remove carefully.
Use silicone or wooden utensils to lift the waffle from the iron without scratching the cooking surface. Transfer it to a wire rack.
Step 9: Repeat the process.
Continue with the remaining batter. Grease the plates again only when needed.
Step 10: Decorate and serve.
Dust the waffles with powdered sugar, drizzle them with chocolate sauce, or add berries and whipped cream. For a Halloween presentation, use chocolate syrup to emphasize the web pattern.
Variations
For a richer fall version, add extra cinnamon along with a small pinch of nutmeg and ginger. These spices create a cozy flavor that pairs beautifully with maple syrup.
For chocolate spiderweb waffles, replace 2 tablespoons of flour with unsweetened cocoa powder. Add a few chocolate chips if your waffle maker handles them well.
For a dairy-free adaptation, use your favorite unsweetened plant-based milk and a dairy-free butter substitute. The batter should remain pourable and slightly thick.
You can also make mini spiderweb waffles for parties. Use smaller portions of batter and reduce the cooking time as needed.
For a naturally sweeter variation, serve the finished waffles with sliced bananas, strawberries, blueberries, or warm cinnamon apples instead of adding extra sugar to the batter.
These options make the basic recipe easy to adapt for different seasons, dietary preferences, and occasions.
Storage and Serving
Let leftover waffles cool completely before storing them. Place them in an airtight container and refrigerate for up to 3 days. For longer storage, arrange them in a freezer-safe bag with parchment between the waffles and freeze for up to 2 months.
To reheat, use a toaster or toaster oven for the crispiest results. You can also warm them in a conventional oven at 350°F (175°C) until heated through. Avoid microwaving when possible because it can soften the crisp exterior.
For serving, try classic maple syrup and butter for breakfast. For a festive presentation, add powdered sugar, whipped cream, berries, and chocolate drizzle. You can also serve them with vanilla yogurt and fruit for a lighter brunch.
For Halloween gatherings, arrange several waffles on a platter and decorate each one differently. The variety makes the table look abundant without requiring complicated presentation.
FAQs
1. Can I make the batter ahead of time?
Yes. You can refrigerate the prepared batter for several hours. Stir gently before using because the ingredients may settle.
2. Why are my waffles not crispy?
Your waffle iron may not be hot enough, or the finished waffles may be trapping steam. Preheat thoroughly and cool cooked waffles on a wire rack.
3. Can I freeze spiderweb waffles?
Absolutely. Cool them completely, separate them with parchment, and freeze in an airtight freezer bag for up to 2 months.
4. How much batter should I use?
The amount depends on your waffle maker. Start with less than you think you need, then increase slightly if the web pattern does not fill completely.
5. Can I make them without cinnamon?
Yes. Cinnamon adds warmth but remains optional. For a classic waffle flavor, simply leave it out.
This Spiderweb waffles review is comfort food at its finest, combining crisp golden edges, fluffy centers, and a playful web-inspired design. It’s the kind of dish that turns an ordinary breakfast into a memorable Halloween brunch, cozy fall gathering, or fun weekend treat. With simple ingredients, flexible toppings, and an easy cooking process, these waffles give you plenty of room to make them your own. Serve them warm with maple syrup, berries, chocolate, or whipped cream, and let everyone decorate their own. Once you see how charming they look on the table, you may want to make them all season long.
Print
Spiderweb Waffles Review
- Total Time: 45
Ingredients
- 2 cups (240 g) all-purpose flour
- 2 tbsp (25 g) granulated sugar
- 1 tbsp (12 g) baking powder
- 1/2 tsp (3 g) salt
- 2 large eggs
- 1 3/4 cups (420 ml) whole milk
- 1/2 cup (113 g) unsalted butter, melted
- 1 tsp (5 ml) vanilla extract
- 1/2 tsp ground cinnamon, optional
- Cooking spray or melted butter
Instructions
- Whisk together flour, sugar, baking powder, salt, and cinnamon.
- In another bowl, whisk eggs, milk, melted butter, and vanilla.
- Pour the wet mixture into the dry ingredients and stir gently until combined.
- Preheat and lightly grease the spiderweb waffle maker.
- Add a modest amount of batter to the center of the waffle pattern.
- Close the waffle maker and cook until golden and crisp.
- Carefully remove the waffle and place it on a wire rack.
- Repeat with the remaining batter.
- Serve warm with maple syrup, powdered sugar, berries, whipped cream, or chocolate sauce
- Prep Time: 15
- Cook Time: 20
- Category: Breakfast
- Cuisine: American