
Introduction
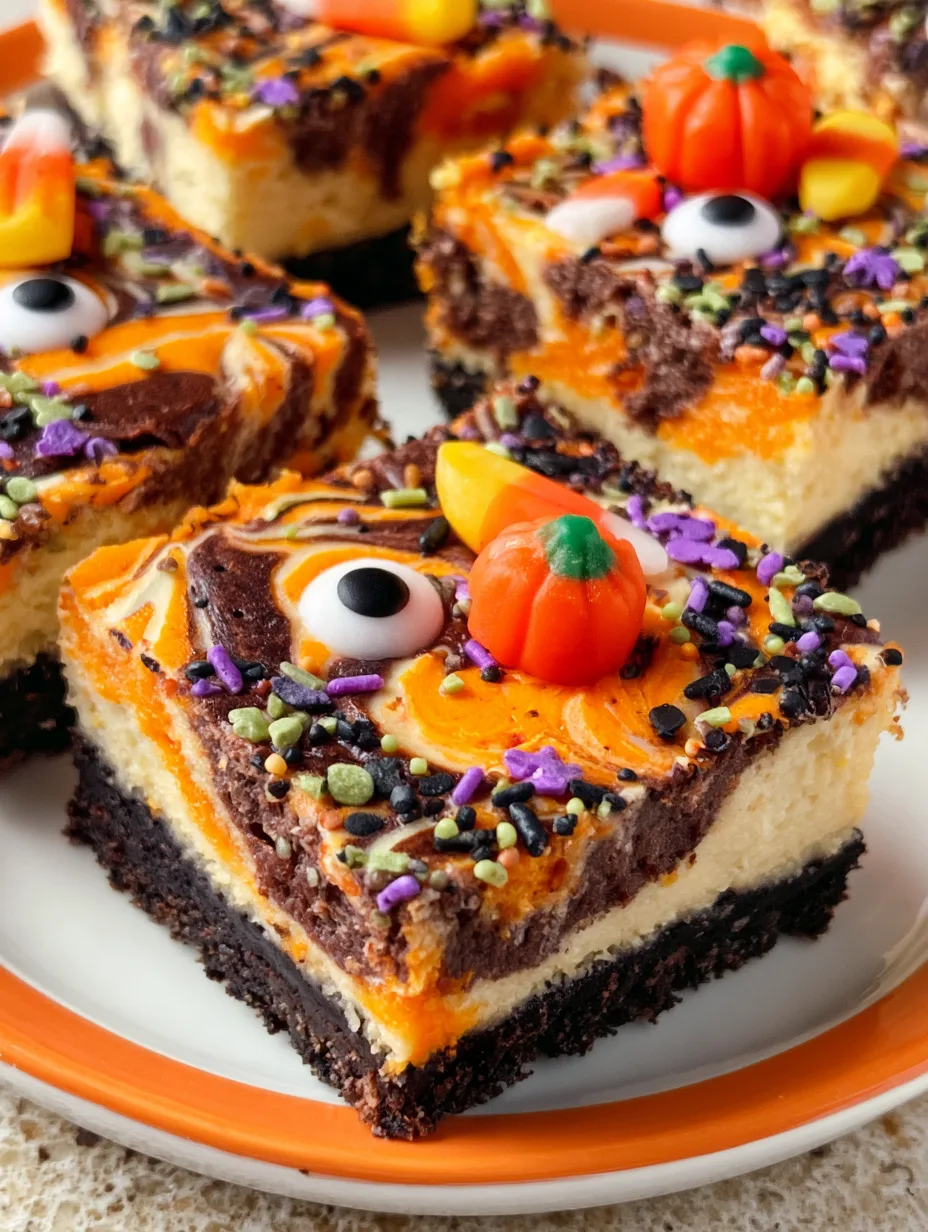
Creamy, silky cheesecake meets a buttery cookie crust and spooky Halloween flair in these Halloween Cheesecake Bars – Easy Spooky Dessert Recipe. Each bite delivers a rich cheesecake center, a crisp base, and a fun decorative finish that makes dessert feel party-ready. They look impressive on a Halloween table, yet the preparation stays surprisingly simple. Whether you are hosting a costume party, packing treats for a gathering, or baking with the kids, these bars bring festive flavor without complicated techniques. You’ll learn how to make, decorate, store, and serve these spooky cheesecake bars with confidence.
Why You’ll Love This Recipe
These Halloween Cheesecake Bars – Easy Spooky Dessert Recipe bring together everything you want from a festive dessert: creamy texture, buttery richness, chocolate-cookie crunch, and playful Halloween decoration. The cheesecake layer stays smooth and luscious while the crust provides a satisfying contrast in every bite.
You also do not need advanced decorating skills. Simple swirls of chocolate, colorful sprinkles, candy eyes, or Halloween-themed decorations can transform ordinary cheesecake into a spooky centerpiece. The bars also offer excellent make-ahead convenience, making them especially useful when you have a party menu to prepare.
The recipe uses familiar ingredients and straightforward steps, so even beginner bakers can create impressive results. You can cut them into generous squares for dessert or smaller pieces for a Halloween dessert platter.
Best of all, these bars balance rich cheesecake with a slightly crisp crust and creamy topping, giving you a delicious texture contrast that keeps every bite interesting.
Ingredients
For the crust:
- 2 cups (200 g) chocolate sandwich cookie crumbs
- 5 tablespoons (70 g) unsalted butter, melted
- 1 tablespoon (12 g) granulated sugar
For the cheesecake:
- 24 oz. (680 g) full-fat cream cheese, softened
- ¾ cup (150 g) granulated sugar
- 3 large eggs, room temperature
- 1 teaspoon (5 ml) vanilla extract
- ½ cup (120 g) sour cream
- 2 tablespoons (16 g) all-purpose flour
For the Halloween topping:
- ½ cup (90 g) semi-sweet chocolate chips, melted
- ¼ cup (60 ml) heavy cream
- Halloween sprinkles or candy decorations, optional
- Candy eyes, optional
Use softened cream cheese for the smoothest filling. Room-temperature eggs also blend more easily and help prevent a lumpy batter.
Pro Tips
1. Soften the cream cheese properly. Cold cream cheese can leave small lumps in your filling. Let the blocks sit at room temperature for about 30–45 minutes before mixing. Avoid overheating them in the microwave because overly warm cream cheese can change the texture of the batter.
2. Do not overmix the eggs. Once you add the eggs, mix just until they disappear into the batter. Excessive mixing incorporates extra air, which can cause the cheesecake to puff dramatically in the oven and then crack as it cools.
3. Cool the bars gradually. Cheesecake needs patience. Let the baked bars cool at room temperature before refrigerating them. Chilling them for several hours gives the center time to firm up and makes clean slicing much easier.
For especially neat squares, chill the cheesecake overnight and use a sharp knife wiped clean between cuts. If you want dramatic Halloween decoration, add your chocolate designs after the cheesecake has completely chilled.
Step-by-Step Instructions
Step 1: Prepare the pan.
Preheat your oven to 325°F (165°C). Line an 8×8-inch (20×20 cm) baking pan with parchment paper, leaving some paper hanging over the sides. This creates easy handles for lifting the finished cheesecake from the pan.
Step 2: Make the chocolate crust.
Combine the chocolate cookie crumbs, melted butter, and sugar in a bowl. Stir until every crumb looks evenly moistened. Press the mixture firmly into the bottom of the prepared pan. Use the bottom of a measuring cup to create an even, compact layer.
Step 3: Bake the crust.
Bake the crust for 8–10 minutes. Remove it from the oven and let it cool slightly while you prepare the cheesecake filling. Keep the oven at 325°F.
Step 4: Mix the cheesecake filling.
Beat the softened cream cheese and sugar until smooth and creamy. Add the sour cream, vanilla, and flour, then mix until combined. Add the eggs one at a time, mixing gently after each addition. Stop as soon as the batter becomes smooth.
Step 5: Add the filling.
Pour the cheesecake mixture over the slightly cooled crust. Gently smooth the top with a spatula. Tap the pan lightly against the counter once or twice to release large air bubbles.
Step 6: Bake.
Bake for about 35–42 minutes. The edges should look set while the center still has a slight jiggle when you gently move the pan. Do not wait for the center to become completely firm in the oven.
Step 7: Cool and chill.
Turn off the oven, crack the oven door, and let the cheesecake sit inside for about 10 minutes. Remove the pan and cool completely at room temperature. Refrigerate for at least 4 hours, preferably overnight.
Step 8: Create the spooky topping.
Melt the chocolate chips with the heavy cream until smooth. Drizzle or pipe the chocolate over the chilled cheesecake. Add candy eyes, Halloween sprinkles, or other decorations while the chocolate is still soft.
Step 9: Slice and serve.
Lift the cheesecake from the pan using the parchment handles. Cut into squares with a clean, sharp knife. For extra-clean edges, wipe the knife after every cut. Your spooky dessert is ready for the Halloween table.
Variations
For a pumpkin cheesecake version, add ½ cup (120 g) pumpkin puree and 1 teaspoon pumpkin pie spice to the filling. This creates warm fall flavor that pairs beautifully with the chocolate crust.
For a gluten-free adaptation, use certified gluten-free chocolate sandwich cookies for the crust and verify that your other packaged decorations are gluten-free.
You can also create a chocolate swirl cheesecake by dividing the filling and stirring melted chocolate into half. Alternate spoonfuls of plain and chocolate batter, then gently swirl the surface with a knife before baking.
For a more colorful Halloween look, use orange, purple, and black sprinkles or decorate individual squares with candy eyes after chilling.
Storage and Serving
Store Halloween Cheesecake Bars – Easy Spooky Dessert Recipe in an airtight container in the refrigerator for up to 5 days. Keep the bars chilled until you are ready to serve because the cheesecake filling softens as it sits at room temperature.
For a Halloween party, arrange the bars on a dark serving platter and scatter a few themed sprinkles around them for a festive presentation. Serve them with whipped cream and extra chocolate drizzle for a richer dessert.
You can also serve smaller squares alongside cookies, brownies, and fruit for a Halloween dessert board. If you need to prepare ahead, bake and chill the cheesecake a day before your event, then decorate it shortly before serving.
For longer storage, freeze undecorated bars for up to 2 months. Wrap them tightly, thaw overnight in the refrigerator, and decorate after thawing.
FAQs
1. Can I make these cheesecake bars ahead of time?
Yes. They are ideal for making ahead. Prepare them the day before and refrigerate overnight for the best texture.
2. How do I know when the cheesecake is done?
The edges should look set while the center retains a gentle jiggle. It will continue firming as it cools and chills.
3. Why did my cheesecake crack?
Overmixing, overbaking, or sudden temperature changes can contribute to cracks. Mix gently and allow the cheesecake to cool gradually.
4. Can I use a different crust?
Absolutely. Graham cracker crumbs, chocolate graham crackers, or another crisp cookie can replace the chocolate sandwich cookies.
5. Can I freeze these Halloween cheesecake bars?
Yes. Freeze them without the decorative toppings for up to 2 months. Thaw them overnight in the refrigerator, then add the decorations before serving.
This Halloween Cheesecake Bars – Easy Spooky Dessert Recipe is comfort food at its finest — creamy, chocolatey, festive, and irresistibly fun. It’s the kind of dessert that turns a simple Halloween gathering into a memorable celebration. With its buttery cookie crust, silky cheesecake filling, and spooky chocolate decorations, every square looks special without requiring complicated decorating skills. Make them ahead for easier entertaining, customize the toppings to match your Halloween theme, and serve them chilled for the perfect texture. Once you see how simple these cheesecake bars are to make, they may become your favorite spooky treat for every Halloween season.
Print
Halloween Cheesecake Bars – Easy Spooky Dessert Recipe
- Total Time: 45
Description
These spooky cheesecake bars are creamy, chocolatey, and made for Halloween parties. They look impressive on the dessert table but are surprisingly easy to make.
Ingredients
- 2 cups (200 g) chocolate sandwich cookie crumbs
- 5 tablespoons (70 g) unsalted butter, melted
- 1 tablespoon (12 g) granulated sugar
- 24 oz. (680 g) full-fat cream cheese, softened
- ¾ cup (150 g) granulated sugar
- 3 large eggs, room temperature
- 1 teaspoon (5 ml) vanilla extract
- ½ cup (120 g) sour cream
- 2 tablespoons (16 g) all-purpose flour
- ½ cup (90 g) semi-sweet chocolate chips
- ¼ cup (60 ml) heavy cream
- Halloween sprinkles, optional
- Candy eyes, optional
Instructions
- Preheat oven to 325°F (165°C) and line an 8×8-inch (20×20 cm) pan with parchment paper.
- Combine chocolate cookie crumbs, melted butter, and sugar, then press firmly into the pan.
- Bake the crust for 8–10 minutes and let it cool slightly.
- Beat softened cream cheese and sugar until smooth.
- Mix in sour cream, vanilla, and flour, then add eggs one at a time and mix gently.
- Pour the cheesecake filling over the crust and smooth the top.
- Bake for 35–42 minutes, until the edges are set and the center gently jiggles.
- Cool gradually, then refrigerate for at least 4 hours or overnight.
- Melt chocolate chips with heavy cream and drizzle over the chilled cheesecake.
- Add Halloween sprinkles or candy eyes, then slice into squares and serve.
- Prep Time: 15
- Category: Baking
- Cuisine: American