
Introduction
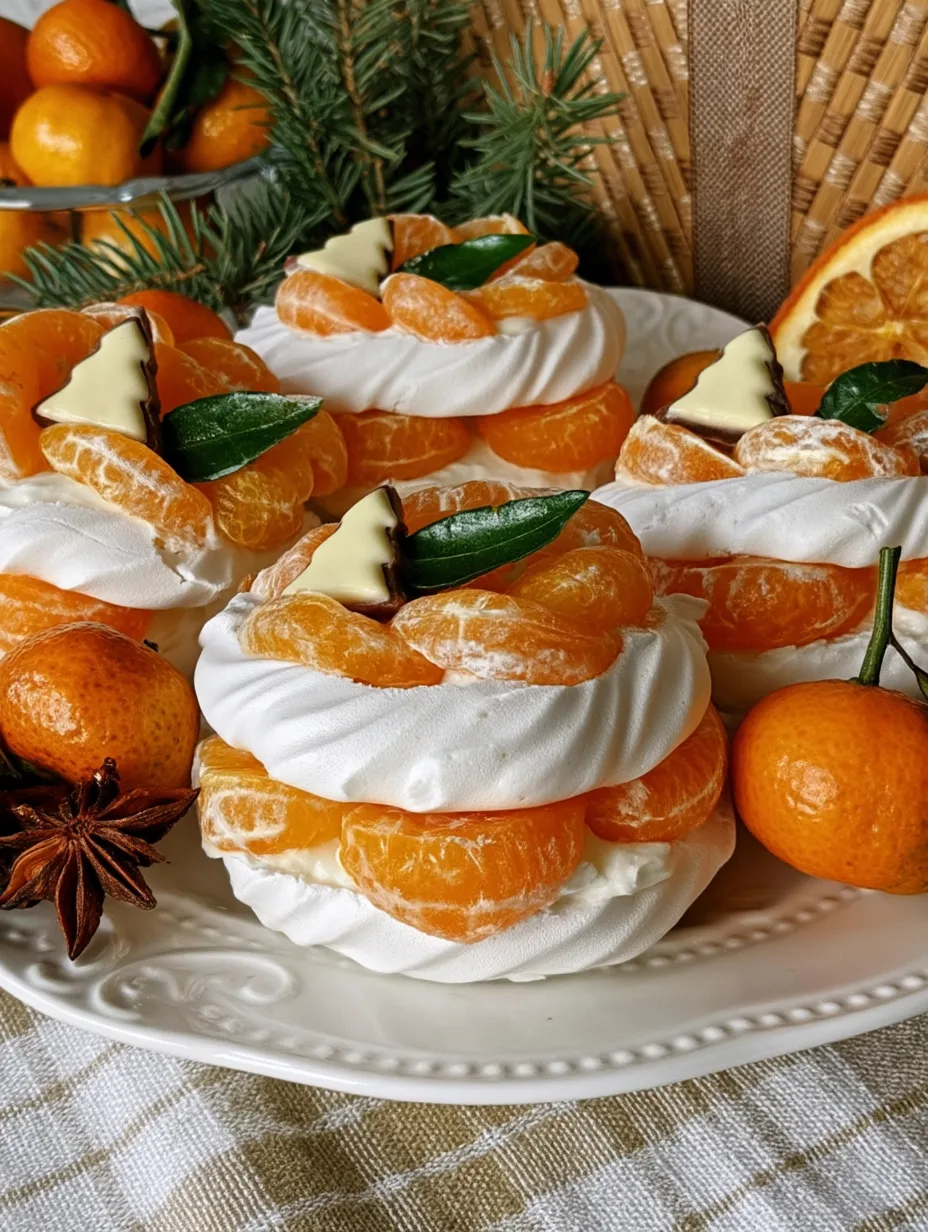
Crispy on the outside, soft and marshmallow-like in the center, and bursting with fresh citrus flavor, these Mini Orange Pavlova desserts bring sunshine to every occasion. Each little meringue nest features a delicate orange aroma, fluffy whipped cream, and a refreshing citrus topping that makes every bite irresistible. They’re elegant enough for holiday celebrations yet simple enough for a weekend treat. If you love light desserts with beautiful textures and bright flavors, this recipe is perfect. You’ll learn… how to create perfectly crisp mini pavlovas with a delicious orange twist.
Why You’ll Love This Recipe
There are so many reasons to fall in love with these Mini Orange Pavlova desserts. First, their delicate appearance makes them look like something straight from a French pastry shop, but you don’t need professional baking skills to prepare them.
The biggest attraction is the contrast of textures. Each pavlova has a crisp, delicate shell that gives way to a soft, chewy marshmallow center. The whipped cream adds a silky richness, while fresh oranges bring a juicy, refreshing finish.
You’ll also appreciate how easy they are to customize. Make the meringue nests ahead of time, then add the cream and toppings shortly before serving. This makes entertaining much easier, especially during busy holidays.
Their individual portions look beautiful on dessert plates, making them ideal for Christmas dinners, birthday parties, afternoon tea, baby showers, and special family gatherings.
Best of all, the citrus flavor balances the sweetness of the meringue, creating a dessert that feels light, fresh, and wonderfully indulgent.
Ingredients
Simple ingredients create the magic behind these Mini Orange Pavlova treats. Choose fresh eggs and fragrant oranges for the best results.
-
4 large egg whites (120 g): Use room-temperature egg whites for better volume and stability.
-
1 cup superfine sugar (200 g): Creates a smooth, glossy meringue.
-
1 teaspoon cornstarch (3 g): Helps create a soft, marshmallow-like center.
-
1 teaspoon white vinegar (5 ml): Helps stabilize the meringue.
-
1 teaspoon vanilla extract (5 ml): Adds warmth and sweetness.
-
1 tablespoon finely grated orange zest: Provides fresh citrus aroma.
-
1 cup heavy whipping cream (240 ml): Creates a light, fluffy topping.
-
2 tablespoons powdered sugar (15 g): Sweetens the whipped cream.
-
2 medium oranges: Peeled and segmented for decorating.
-
1 tablespoon fresh orange juice (15 ml): Adds extra citrus flavor to the topping.
-
Fresh mint leaves: Optional garnish for a beautiful finish.
Pro Tips
Perfect meringue requires patience and a few simple techniques. Keep these three tips in mind for beautiful results every time.
1. Keep Your Mixing Bowl Completely Clean
Even a small amount of grease or egg yolk can prevent egg whites from whipping properly. Wash and dry your mixing bowl and whisk thoroughly before starting. Separate each egg carefully, preferably while cold, then let the whites reach room temperature before whipping.
2. Add Sugar Slowly
Don’t rush the sugar addition. Once the egg whites become foamy and start forming soft peaks, add the superfine sugar one tablespoon at a time. Allow each addition to dissolve before adding more. Rub a little meringue between your fingers. If it feels grainy, continue whisking until smooth and glossy.
3. Cool the Pavlovas Gradually
Sudden temperature changes can cause meringue to crack excessively or collapse. Once baking finishes, switch off the oven and leave the pavlovas inside with the door slightly open. Let them cool completely before decorating. This gradual cooling helps maintain their delicate structure.
One additional trick: assemble the desserts just before serving to preserve the crisp exterior.
Step-by-Step Instructions
Making Mini Orange Pavlova is easier than it looks. Follow these steps, take your time with the meringue, and you’ll have beautiful individual desserts ready to impress.
Step 1: Prepare Your Oven and Baking Tray
Preheat your oven to 250°F (120°C). Line a large baking sheet with parchment paper. Draw six to eight small circles, approximately 3 inches (7.5 cm) wide, on the underside of the parchment as guides.
Make sure your mixing equipment stays completely clean and dry. Separate the egg whites from the yolks carefully, ensuring no yolk enters the whites.
Step 2: Whip the Egg Whites
Place the room-temperature egg whites in a large mixing bowl. Using an electric mixer, beat them on medium speed until they become foamy and start forming soft peaks.
Gradually increase the speed to medium-high. Continue beating until the whites become thick, fluffy, and hold their shape.
Avoid adding sugar too early. The egg whites need enough air incorporated to create a stable foundation.
Step 3: Add the Sugar Gradually
With the mixer running, add the superfine sugar one tablespoon at a time. Beat well between additions until the mixture becomes thick, glossy, and forms stiff peaks.
Check that the sugar has dissolved completely by rubbing a small amount between your fingertips. A smooth texture means your meringue is ready.
Step 4: Add the Flavoring and Stabilizers
Gently sprinkle the cornstarch over the meringue. Add the white vinegar, vanilla extract, and finely grated orange zest.
Use a spatula to fold everything together gently. Avoid overmixing because you want to preserve the air inside the meringue.
The orange zest gives the pavlovas a lovely citrus fragrance without adding too much moisture.
Step 5: Shape the Mini Pavlovas
Transfer the meringue into a piping bag fitted with a large round or star-shaped nozzle. Pipe small circles onto your prepared baking sheet, following your parchment guides.
Alternatively, use two spoons to create individual nests.
Make a shallow well in the center of each pavlova using the back of a spoon. This little space will hold the whipped cream and orange topping later.
Keep the sides slightly raised so the finished desserts look like pretty little nests.
Step 6: Bake Until Crisp
Place the baking sheet in the preheated oven. Bake for approximately 60–75 minutes, depending on the size of your pavlovas.
The outside should feel dry and crisp, while the centers remain soft. Avoid opening the oven frequently because temperature changes can affect the meringue.
When baking finishes, turn off the oven and leave the pavlovas inside for another hour with the door slightly open.
Step 7: Prepare the Orange Whipped Cream
While the pavlovas cool, prepare the topping.
Pour the cold heavy whipping cream into a chilled mixing bowl. Add the powdered sugar and beat until soft to medium peaks form.
Gently fold in the fresh orange juice. If you prefer a stronger citrus flavor, add a little extra orange zest.
Keep the cream refrigerated until you’re ready to assemble the desserts.
Step 8: Prepare the Orange Topping
Peel the oranges and remove as much of the white pith as possible. Separate them into segments and remove any seeds.
Pat the segments gently with a paper towel to remove excess moisture. This small step helps prevent the whipped cream and meringue from becoming soggy.
For an attractive presentation, keep some segments whole and cut others into smaller pieces.
Step 9: Assemble and Decorate
Arrange the cooled pavlova nests on a serving platter. Spoon or pipe a generous amount of orange whipped cream into each center.
Top with fresh orange segments and a little additional orange zest. Add small mint leaves for a pop of color if desired.
For an extra elegant finish, drizzle a little orange syrup over the fruit just before serving.
Step 10: Serve and Enjoy
Serve your Mini Orange Pavlova immediately after assembling for the best contrast between crisp meringue, fluffy cream, and juicy fruit.
Arrange them individually on dessert plates or display them together on a festive serving tray.
Enjoy every light, citrusy bite!
Variations
One of the best things about Mini Orange Pavlova is how easily you can adapt the flavors to suit different occasions.
1. Chocolate Orange Pavlova
Add one tablespoon of unsweetened cocoa powder to the meringue, folding it in gently. Finish each pavlova with whipped cream, orange segments, and dark chocolate shavings. The combination of rich chocolate and fresh citrus tastes wonderful.
2. Berry and Orange Pavlova
Replace some of the orange topping with fresh raspberries, strawberries, or blueberries. The berries add beautiful color and a slightly tart flavor that balances the sweet meringue.
3. Dairy-Free Orange Pavlova
Keep the traditional egg-white meringue and replace the whipped cream with a dairy-free coconut whipping cream. Choose a thick, well-chilled variety for the best texture. Add fresh orange segments and toasted coconut for a tropical finish.
You can also experiment with blood oranges when they’re in season for a deeper color and slightly different citrus flavor.
Storage and Serving
Meringue desserts taste best when you assemble them shortly before serving. Fortunately, you can prepare the different components ahead of time.
Storing Unfilled Pavlovas: Place completely cooled meringue nests in an airtight container. Keep them at room temperature in a cool, dry place for up to three days. Avoid humid environments because moisture can soften the shells.
Storing Whipped Cream: Keep prepared orange whipped cream in a covered container in the refrigerator for up to 24 hours. Give it a gentle whisk if it loses some of its volume.
Storing Assembled Pavlovas: Refrigerate leftovers in an airtight container and enjoy within 24 hours. Keep in mind that the meringue will gradually soften once it touches the cream and fruit.
Serving Suggestions:
-
Serve with hot coffee, cappuccino, or your favorite tea for an elegant afternoon dessert.
-
Add them to a Christmas dessert table alongside chocolate truffles and fruit tarts.
-
Pair with fresh berries and a light orange sauce for a beautiful dinner-party presentation.
For the prettiest results, decorate each pavlova just before bringing it to the table.
Frequently Asked Questions
1. Why Did My Pavlova Crack?
Small cracks are completely normal. Rapid temperature changes, overbeating, or sudden cooling can cause larger cracks. Let your pavlovas cool slowly inside the oven after baking.
2. Can I Make Mini Pavlova Ahead of Time?
Absolutely! Bake the meringue nests up to three days ahead. Store them in an airtight container at room temperature and add the whipped cream and oranges shortly before serving.
3. How Do I Know When the Meringues Are Ready?
The outside should feel dry and crisp, and the pavlovas should lift easily from the parchment paper. The centers should remain soft and marshmallow-like.
4. Can I Use Regular Granulated Sugar?
Yes, but superfine sugar dissolves more easily and creates a smoother meringue. If you only have regular granulated sugar, process it briefly in a food processor to make the crystals finer.
5. Why Are My Pavlovas Sticky?
Humidity often causes meringue to absorb moisture from the air. Undissolved sugar can also contribute to stickiness. Make sure the sugar dissolves completely and store the cooled pavlovas in an airtight container.
Conclusion
This Mini Orange Pavlova is comfort food at its finest, combining crisp golden-white meringue shells, fluffy citrus cream, and juicy orange segments in every delightful bite. It’s the kind of dessert that makes ordinary gatherings feel special and brings a touch of elegance to holiday celebrations, birthdays, and dinner parties. With their beautiful individual portions and refreshing flavor, these little treats are guaranteed to impress. Prepare the meringue ahead, add your favorite toppings, and enjoy a light, irresistible dessert that everyone will remember.
Print
Mini Orange Pavlova
- Total Time: 45
Description
Bring a little sunshine to your dessert table with these gorgeous mini orange pavlovas! Each bite combines delicate crunchy meringue, fluffy orange cream, and fresh citrus for an unforgettable treat.
Ingredients
-
4 large egg whites (120 g), room temperature
-
1 cup superfine sugar (200 g)
-
1 teaspoon cornstarch (3 g)
-
1 teaspoon white vinegar (5 ml)
-
1 teaspoon vanilla extract (5 ml)
-
1 tablespoon finely grated orange zest
-
1 cup heavy whipping cream (240 ml), chilled
-
2 tablespoons powdered sugar (15 g)
-
2 medium oranges, peeled and segmented
-
1 tablespoon fresh orange juice (15 ml)
-
Fresh mint leaves, optional
Instructions
-
Preheat the oven to 250°F (120°C). Line a baking sheet with parchment paper and draw six to eight 3-inch circles as guides.
-
Separate the egg whites from the yolks, ensuring the whites remain free from any yolk or grease.
-
Beat the egg whites with an electric mixer until foamy and soft peaks form.
-
Gradually add the superfine sugar, one tablespoon at a time, beating until the meringue becomes thick, glossy, and forms stiff peaks.
-
Gently fold in the cornstarch, white vinegar, vanilla extract, and orange zest.
-
Pipe or spoon the meringue into small nests on the prepared baking sheet, creating shallow wells in the centers.
-
Bake for 60–75 minutes until the outsides feel dry and crisp.
-
Turn off the oven and let the pavlovas cool inside for one hour with the door slightly open.
-
Beat the chilled whipping cream with powdered sugar until soft to medium peaks form. Gently fold in the orange juice.
-
Peel and segment the oranges, removing any seeds and excess moisture.
-
Fill each cooled pavlova with orange whipped cream and decorate with fresh orange segments.
-
Garnish with additional orange zest and fresh mint leaves. Serve immediately for the best texture.
- Prep Time: 25
- Category: Baking
- Cuisine: amircain