
Introduction
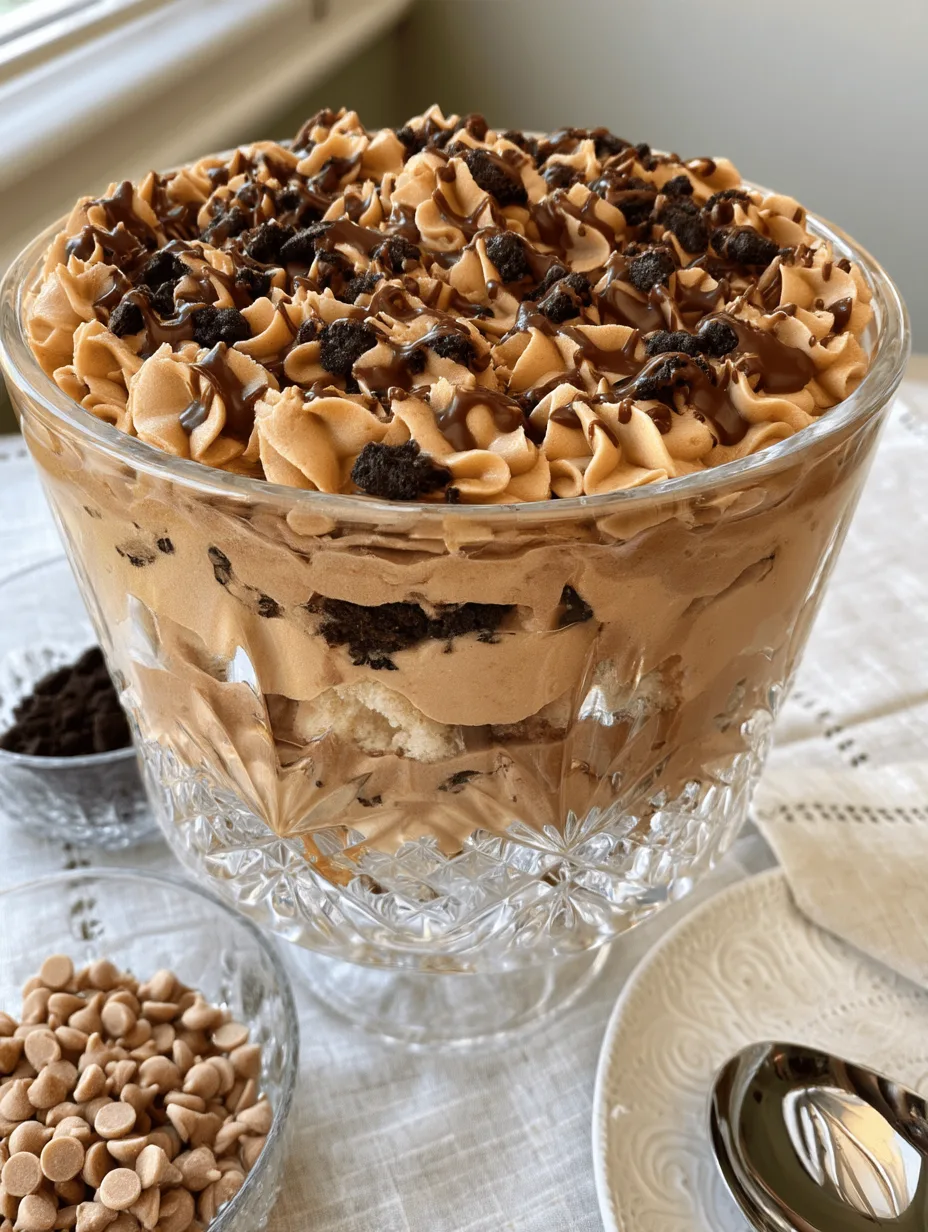
Rich, chocolatey, creamy, and irresistibly nutty, Chocolate Peanut Butter Trifle is the ultimate dessert for anyone who loves the classic combination of chocolate and peanut butter. Every spoonful brings together layers of moist chocolate cake, fluffy peanut butter cream, silky chocolate pudding, and crunchy peanut butter cups. This showstopping dessert looks impressive in a glass trifle bowl, yet it requires surprisingly little effort to assemble. Whether you’re planning a holiday gathering, birthday celebration, or casual family dinner, this indulgent treat always makes an impression. You’ll learn… how to create beautiful layers, achieve the perfect creamy texture, and serve a dessert everyone will remember.
Why You’ll Love This Recipe
There are plenty of reasons to fall in love with Chocolate Peanut Butter Trifle, especially if you enjoy desserts that combine contrasting flavors and textures. The chocolate cake provides a soft, tender foundation, while the peanut butter filling adds a smooth, rich, slightly salty sweetness. Chocolate pudding brings everything together with its silky consistency, creating a dessert that tastes wonderfully decadent without requiring complicated baking techniques.
Another reason to love this recipe is its beautiful presentation. Transparent glass layers reveal the alternating chocolate and peanut butter colors, making the trifle look like something straight from a bakery display. A generous topping of whipped cream, chocolate shavings, and chopped peanut butter cups gives every serving an irresistible finishing touch.
You can also prepare most components ahead of time, which makes entertaining much easier. Instead of assembling individual pastries or decorating a complicated cake, simply layer the ingredients in one large bowl.
Best of all, this dessert offers plenty of flexibility. Use homemade chocolate cake when you have time or a boxed mix when convenience matters most. Either way, you’ll enjoy a crowd-pleasing dessert with rich chocolate flavor, creamy peanut butter goodness, and satisfying crunchy bites in every spoonful.
Ingredients
Gather these ingredients before assembling your trifle. The quantities below make approximately 10–12 servings, depending on the size of your portions and serving glasses.
- 1 chocolate cake, about 9 inches (23 cm): Use a homemade cake or a prepared cake from your favorite boxed mix. Let it cool completely before cutting it into cubes.
- 3.4 oz (96 g) instant chocolate pudding mix: This creates a smooth, chocolate-rich layer.
- 2 cups (475 ml) cold whole milk: Milk helps the pudding develop its creamy consistency.
- 1 cup (250 g) creamy peanut butter: Choose a conventional, well-stirred peanut butter for a smooth filling.
- 8 oz (225 g) cream cheese, softened: Adds tanginess and structure to the peanut butter cream.
- 1 cup (120 g) powdered sugar: Sweetens the filling without creating a grainy texture.
- 2 cups (480 ml) whipped topping, thawed: Lightens the peanut butter mixture.
- 1 cup (240 ml) heavy whipping cream: Use this for a fresh whipped topping if desired.
- 1/2 cup (85 g) chopped peanut butter cups: Adds chocolate-peanut crunch.
- 1/4 cup (40 g) chocolate shavings or mini chocolate chips: Finishes the dessert with extra chocolate flavor.
Pro Tips
1. Cool every component completely. Warm cake can melt the creamy filling and loosen the pudding, leaving your trifle messy rather than beautifully layered. Bake the cake ahead of time, allow it to cool completely, and then cut it into bite-sized cubes. Prepare the pudding according to the package directions and chill it until thick. Cold components create cleaner layers and help the dessert maintain its structure.
2. Make the peanut butter filling smooth and fluffy. Let the cream cheese soften at room temperature before mixing. Beat it until smooth, then add the peanut butter and powdered sugar. Scrape down the bowl to eliminate lumps before folding in the whipped topping. Fold gently rather than beating vigorously at this stage. This technique keeps the filling light and airy while preserving its rich peanut butter flavor.
3. Build attractive layers without overpacking them. Start with a layer of chocolate cake, followed by peanut butter cream and chocolate pudding. Repeat until you use the ingredients, leaving enough room for the topping. Press the cake pieces gently into place without crushing them. If you want especially neat layers, use a large spoon or piping bag to distribute the cream. Finally, refrigerate the assembled dessert for at least two hours. This resting time allows the flavors to mingle and makes serving easier.
Step-by-Step Instructions
Step 1: Bake and prepare the chocolate cake.
Bake your favorite chocolate cake according to its recipe or package instructions. Allow it to cool completely on a wire rack. Once cool, cut it into small, roughly 1-inch (2.5 cm) cubes. Keep the pieces similar in size so they distribute evenly throughout the trifle. If you’re using leftover cake, remove any overly dry edges and reserve the soft portions for layering.
Step 2: Prepare the chocolate pudding.
Whisk the instant chocolate pudding mix with 2 cups (475 ml) of cold milk in a medium bowl. Follow the package directions, whisking until the mixture thickens. Refrigerate it while you prepare the peanut butter filling. The pudding should hold its shape on a spoon without becoming stiff or rubbery.
Step 3: Make the peanut butter cream.
Place the softened cream cheese in a large mixing bowl. Beat until completely smooth, then add the creamy peanut butter and powdered sugar. Continue mixing until the ingredients combine into a thick, uniform filling. Gently fold in the thawed whipped topping with a spatula. Stop as soon as the mixture looks fluffy and evenly blended. Avoid overmixing, which can reduce its airy texture.
Step 4: Prepare the whipped cream topping.
If you’re making fresh whipped cream, pour the cold heavy whipping cream into a chilled bowl. Beat with an electric mixer until medium-to-stiff peaks form. Keep the cream refrigerated until you’re ready to decorate. You can skip this step if you prefer to finish the dessert with additional whipped topping.
Step 5: Add the first layer of cake.
Choose a large glass trifle bowl or individual dessert glasses. Arrange a layer of chocolate cake cubes across the bottom. Distribute them evenly, filling large gaps without pressing the cake too firmly. The cake should create a sturdy base that absorbs a little moisture from the creamy layers.
Step 6: Layer the peanut butter cream and chocolate pudding.
Spread or pipe a generous layer of peanut butter cream over the cake. Add a layer of chocolate pudding, smoothing it gently with the back of a spoon. Sprinkle a small handful of chopped peanut butter cups over the top for extra crunch. Keep some candy pieces for the final decoration.
Step 7: Repeat the layers.
Continue layering the cake, peanut butter cream, chocolate pudding, and chopped peanut butter cups until you use most of the ingredients. Depending on your bowl, you may create two or three complete sets of layers. Aim for balanced proportions so every serving includes all the essential flavors.
Step 8: Decorate and chill.
Finish with fresh whipped cream or additional whipped topping. Scatter chocolate shavings, mini chocolate chips, and the remaining chopped peanut butter cups over the surface. Cover the bowl and refrigerate for at least two hours before serving. For the best texture, avoid adding delicate crunchy toppings too early if you want them to retain their crispness.
Step 9: Serve and enjoy.
Spoon the chilled trifle into dessert bowls, making sure each portion includes cake, peanut butter cream, pudding, and toppings. Use a long-handled spoon to reach the bottom layers. Serve cold and return any leftovers to the refrigerator promptly.
Variations
One of the best things about Chocolate Peanut Butter Trifle is how easily you can adapt it to different tastes and occasions.
Chocolate brownie version: Replace the chocolate cake with fudgy brownies cut into small cubes. Their dense texture creates an especially rich dessert that pairs beautifully with the fluffy peanut butter filling.
Extra-crunchy version: Add chopped roasted peanuts, crushed chocolate sandwich cookies, or peanut butter wafer candies between the layers. Reserve some crunchy ingredients for the topping so they retain their texture.
Lighter version: Use reduced-fat cream cheese and a lighter whipped topping. You can also choose a less-sweet chocolate pudding if available. The result will still taste creamy and chocolatey, although the texture may differ slightly from the original.
For another delicious twist, try a chocolate peanut butter dessert trifle with a thin layer of sliced bananas. Their natural sweetness complements the chocolate and nutty filling, creating a flavor combination reminiscent of a chocolate-covered banana with peanut butter.
Storage and Serving
Refrigerate your finished trifle in a tightly covered container or cover the serving bowl with plastic wrap. For the best flavor and texture, enjoy it within 2–3 days. The cake gradually absorbs moisture from the pudding and cream, becoming softer as the dessert rests. Many people enjoy this texture, but the trifle may lose some of its distinct layers after several days.
For the freshest presentation, add the final chocolate shavings and crunchy peanut butter cup pieces shortly before serving. This helps preserve their texture and keeps the topping attractive.
Avoid leaving the trifle at room temperature for more than two hours, or one hour in temperatures above 90°F (32°C). Because the dessert contains dairy, keep it chilled between servings.
For serving, pair a small bowl with freshly brewed coffee or espresso to balance the sweetness. You can also offer it alongside fresh strawberries or raspberries for a fruity contrast. For parties, prepare individual portions in clear dessert cups. They look elegant, simplify serving, and let guests enjoy the beautiful layers without disturbing the main trifle bowl.
Freezing isn’t recommended because the pudding, cream cheese filling, and whipped topping can separate or become watery after thawing.
Frequently Asked Questions
1. Can I make this trifle ahead of time?
Yes! Assemble it up to 24 hours before serving and refrigerate it, covered. Add crunchy toppings just before serving for the best texture.
2. Can I use store-bought chocolate cake?
Absolutely. A bakery chocolate cake or boxed cake works beautifully. Choose a moist cake that holds together when cut into cubes.
3. Do I need a special trifle bowl?
No. A large glass bowl works well, but individual dessert glasses, mason jars, or a deep serving dish also make attractive alternatives.
4. Can I use natural peanut butter?
You can, but natural peanut butter often separates and has a looser texture. Stir it thoroughly before measuring, and choose a variety that mixes smoothly into the cream cheese.
5. How do I keep the layers neat?
Cool the cake, chill the pudding, and use a spoon or piping bag to distribute each layer. Avoid pressing the cake too firmly, and refrigerate the assembled dessert before serving.
Conclusion
This Chocolate Peanut Butter Trifle is comfort food at its finest, with tender chocolate cake, silky pudding, fluffy peanut butter cream, and crunchy candy pieces in every irresistible spoonful. It’s the kind of dessert that turns ordinary family dinners into special occasions and gives holiday gatherings a deliciously memorable finish. Best of all, you can prepare it ahead of time, customize the layers, and serve it with minimal fuss. Whether you’re sharing it with friends or treating yourself to something sweet, this chocolate and peanut butter masterpiece is guaranteed to delight. Grab a spoon, dig into those beautiful layers, and enjoy every decadent bite!
Print
Chocolate Peanut Butter Trifle
- Total Time: 45
Description
Chocolate Peanut Butter Trifle is the ultimate dessert for chocolate and peanut butter lovers. With rich chocolate cake, creamy peanut butter filling, silky pudding, and irresistible candy toppings, every spoonful tastes like pure indulgence. It’s an easy, crowd-pleasing treat that looks stunning on any dessert table.
Ingredients
- 1 chocolate cake, about 9 inches (23 cm), baked and cooled
- 1 package (3.4 oz / 96 g) instant chocolate pudding mix
- 2 cups (475 ml) cold whole milk
- 1 cup (250 g) creamy peanut butter
- 8 oz (225 g) cream cheese, softened
- 1 cup (120 g) powdered sugar
- 2 cups (480 ml) whipped topping, thawed
- 1 cup (240 ml) heavy whipping cream, optional
- 1/2 cup (85 g) chopped peanut butter cups
- 1/4 cup (40 g) chocolate shavings or mini chocolate chips
Instructions
- Bake the chocolate cake according to the recipe or package directions. Let it cool completely, then cut it into bite-sized cubes.
- Whisk the instant chocolate pudding mix with the cold milk according to the package instructions. Refrigerate until thickened.
- Beat the softened cream cheese until smooth. Add the peanut butter and powdered sugar, mixing until creamy.
- Gently fold the whipped topping into the peanut butter mixture until light and fluffy.
- If using fresh whipped cream, beat the cold heavy whipping cream until medium-to-stiff peaks form.
- Arrange a layer of chocolate cake cubes in the bottom of a large glass trifle bowl.
- Spread a layer of peanut butter cream over the cake, followed by a layer of chocolate pudding.
- Sprinkle chopped peanut butter cups over the pudding layer.
- Repeat the cake, peanut butter cream, pudding, and candy layers until the ingredients are used, finishing with whipped cream or whipped topping.
- Decorate with chocolate shavings, mini chocolate chips, and the remaining chopped peanut butter cups.
- Cover and refrigerate for at least 2 hours to allow the layers to chill and the flavors to blend.
- Serve chilled in individual dessert bowls, ensuring each serving includes all the delicious layers. Store leftovers covered in the refrigerator for 2–3 days.
- Prep Time: 25
- Category: Baking
- Cuisine: amircain