
Introduction
Soft, fluffy, and lightly golden on the edges, Easter Bunny Pancakes bring a playful twist to your morning table with a warm, comforting aroma that fills the kitchen. These adorable pancakes are more than just breakfast—they turn an ordinary spring morning into a joyful family moment. Whether you call them bunny-shaped pancakes or fluffy bunny pancakes, this recipe makes Easter extra special and fun for kids and adults alike. Easter Bunny Pancakes is perfect for creating memories while enjoying a sweet, satisfying meal. You’ll learn how to make them step-by-step, customize them, and serve them like a pro.
Why You’ll Love This Recipe
There’s something magical about waking up to a plate of Easter Bunny Pancakes that instantly brings smiles to the table. The soft, pillowy texture contrasts beautifully with crisp golden edges, creating a bite that feels both comforting and exciting.
This recipe stands out because it blends creativity with simplicity. You don’t need fancy tools or advanced cooking skills—just a basic pancake batter and a little imagination. Kids especially love helping shape the bunny ears and decorating faces with fruit, chocolate chips, or whipped cream.
Another reason to love Easter Bunny Pancakes is how customizable it is. You can make them healthier with whole wheat flour or indulgent with chocolate chips and syrup. It’s a breakfast that adapts to your family’s preferences while keeping the festive Easter spirit alive.
Most importantly, it turns breakfast into an experience. Instead of a rushed meal, you get laughter, creativity, and connection around the table. That’s what makes this recipe unforgettable.
Ingredients
To make Easter Bunny Pancakes, you’ll need simple pantry staples that come together into fluffy perfection.
You’ll start with 1 ½ cups (190g) all-purpose flour, which forms the base of your batter. Add 2 tablespoons sugar for a light sweetness and 2 teaspoons baking powder to give the pancakes their signature fluff. A pinch of salt enhances all the flavors.
Next, combine 1 ¼ cups (300ml) milk for smoothness, 1 large egg for structure, and 2 tablespoons melted butter for richness. Add 1 teaspoon vanilla extract for a warm, comforting aroma.
For decorating your Easter Bunny Pancakes, prepare toppings like sliced bananas, strawberries, blueberries, mini chocolate chips, whipped cream, and maple syrup. These ingredients help bring your bunny faces to life and add extra flavor and color.
Pro Tips
To make your Easter Bunny Pancakes truly perfect, focus on texture and shaping.
First, avoid overmixing the batter. Stir until just combined. Lumps are okay—they help keep the pancakes fluffy. Overmixing develops gluten, which can make pancakes dense instead of light and airy.
Second, control your heat carefully. Cook the pancakes on medium-low heat so they rise evenly and develop a golden color without burning. If the pan gets too hot, the bunny shapes may brown too quickly on the outside while staying raw inside.
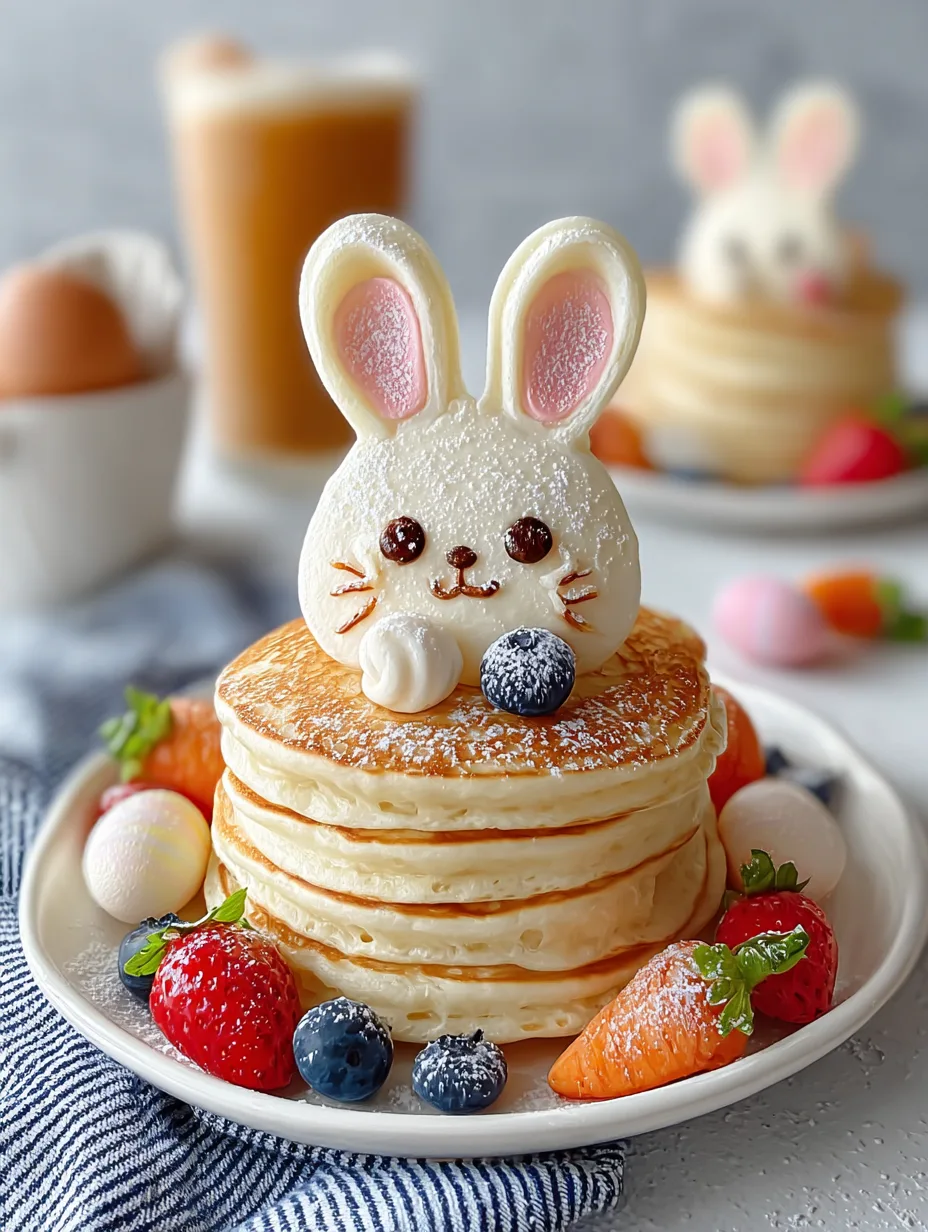
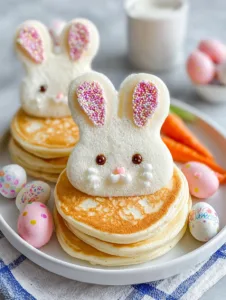
Third, use a squeeze bottle or measuring cup to shape your bunny design. Start with a round base for the face, then add two oval ears. This technique gives your Easter Bunny Pancakes: a neat and recognizable shape.
Finally, let your creativity shine during decorating. Use fruit slices for eyes, chocolate chips for noses, and whipped cream for fluffy cheeks. The more playful you get, the more memorable the breakfast becomes.
Instructions
Step 1: Prepare the Batter
In a large bowl, whisk together flour, sugar, baking powder, and salt. In another bowl, mix milk, egg, melted butter, and vanilla extract. Pour the wet ingredients into the dry ingredients and stir gently until just combined. Do not overmix. The batter should look slightly lumpy for the best Easter Bunny Pancakes texture.
Step 2: Heat the Pan
Place a non-stick skillet or griddle over medium-low heat. Lightly grease it with butter or oil. Allow the pan to heat evenly before adding batter. This ensures your bunny shapes cook consistently without sticking or burning.
Step 3: Shape the Bunny Pancakes
Using a ladle or squeeze bottle, pour batter onto the pan. Create a large circle for the bunny face, then two smaller ovals on top for ears. This step brings Easter Bunny Pancakes to life visually, so take your time and enjoy the process.
Step 4: Cook Until Golden
Cook for 2–3 minutes until bubbles form on the surface and edges look set. Carefully flip using a spatula and cook for another 1–2 minutes. The pancakes should be golden brown and fluffy inside.
Step 5: Decorate the Bunny Faces
Remove pancakes from the pan and place them on a plate. Use fruit slices, chocolate chips, and whipped cream to create bunny faces. This is where Easter Bunny Pancakes: Fun and Delicious Family Breakfast! becomes a fun family activity, especially for kids.
Step 6: Serve Warm
Serve immediately with maple syrup or honey. Add extra toppings if desired. The warmth enhances the soft texture and makes every bite comforting and satisfying.
Variations
You can easily customize Easter Bunny Pancakes to suit different tastes and dietary needs.
For a healthier version, use whole wheat flour and replace sugar with honey or maple syrup. This adds fiber while keeping the pancakes naturally sweet. You can also use almond milk or oat milk for a dairy-free option.
If you want a chocolate twist, add cocoa powder to the batter and decorate with chocolate chips for a richer flavor. Kids especially enjoy this fun variation of Easter Bunny Pancakes.
For a fruity version, mix mashed bananas or blueberries into the batter. This creates naturally sweet bunny pancakes with extra moisture and flavor.
Storage/Serving
If you have leftovers of Easter Bunny Pancakes, store them in an airtight container in the refrigerator for up to 3 days. Reheat in a skillet or microwave until warm and soft.
For longer storage, freeze pancakes in a single layer, then transfer to a freezer bag. They can last up to 2 months and reheat beautifully.
Serve your pancakes with fresh fruit, yogurt, or a drizzle of maple syrup. You can also turn them into a brunch platter alongside scrambled eggs, bacon, or even savory dishes like garlic pasta with bacon-inspired brunch sides for a creative spread.
FAQs
1. Can I make the batter ahead of time?
Yes, you can prepare it the night before and store it in the fridge. Stir gently before cooking.
2. Can I make Easter Bunny Pancakes: Fun and Delicious Family Breakfast! without eggs?
Yes, substitute the egg with mashed banana or a flaxseed mixture.
3. How do I keep bunny shapes from spreading?
Use slightly thick batter and cook on medium-low heat to maintain shape.
4. Can I make these pancakes gluten-free?
Yes, use a 1:1 gluten-free flour blend for best results.
5. What toppings work best?
Fruit, whipped cream, syrup, and chocolate chips all work great for decorating bunny faces.
This Easter Bunny Pancakes is comfort food at its finest — soft, fluffy pancakes shaped into adorable bunnies that bring joy to every bite. It’s the kind of dish that turns a simple morning into a festive celebration filled with laughter, creativity, and connection.
Whether you’re cooking for kids, hosting a spring brunch, or simply celebrating Easter at home, this recipe adds warmth and fun to the table. Easter Bunny Pancakes is more than food—it’s a shared experience that makes memories last beyond the meal itself.
Print
Easter Bunny Pancakes: Fun and Delicious Family Breakfast!
- Total Time: 45 minutes
Ingredients
- 1 ½ cups (190g) all-purpose flour
- 2 tbsp sugar
- 2 tsp baking powder
- 1 pinch salt
- 1 ¼ cups (300ml) milk
- 1 large egg
- 2 tbsp melted butter
- 1 tsp vanilla extract
- Fruit, chocolate chips, whipped cream (for decorating)
Instructions
- Whisk dry ingredients in a bowl. Mix wet ingredients separately, then combine gently.
- Heat a non-stick pan over medium-low heat and grease lightly.
- Pour batter into bunny shapes (circle for face, ovals for ears).
- Cook until bubbles form, then flip and cook until golden.
- Decorate with fruit, chocolate chips, and whipped cream.
- Serve warm with syrup or honey.
- Prep Time: 15 minutes
- Category: Breakfast
- Cuisine: American