
Introduction
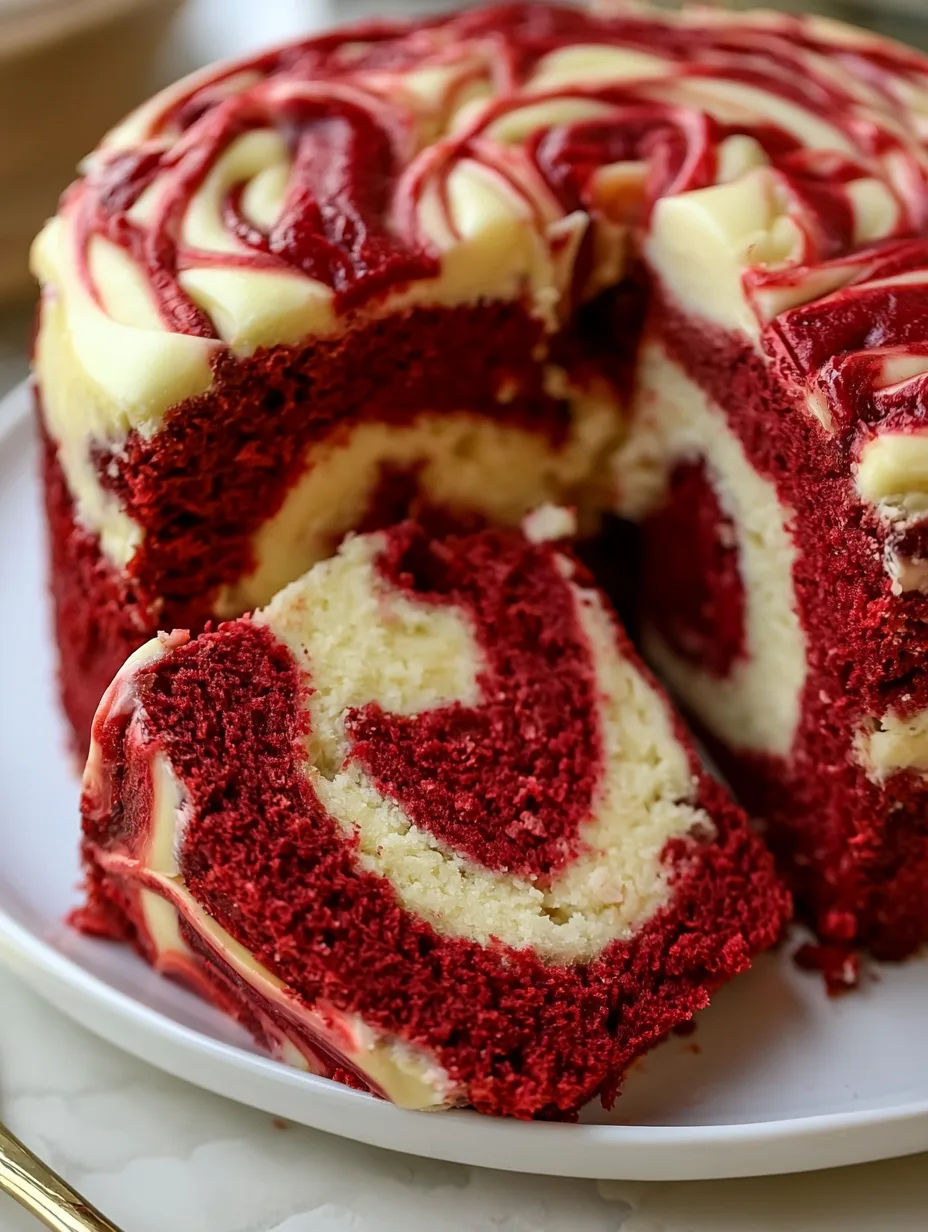
Velvety, chocolate-kissed, and beautifully swirled, Red Velvet Cheesecake Swirl Cake brings together everything you want in an impressive homemade dessert. The tender red velvet cake pairs with a rich cheesecake layer that creates a creamy contrast in every bite. Its striking red-and-white swirls make it perfect for holidays, birthdays, celebrations, or an elegant weekend treat. Best of all, you can create those gorgeous swirls without complicated decorating skills. You’ll learn how to make a moist cake, a smooth cheesecake filling, and a bakery-style swirl that looks as wonderful as it tastes.
Why You’ll Love This Recipe
There is something irresistible about the combination of soft red velvet cake and creamy cheesecake. Red Velvet Cheesecake Swirl Cake delivers two favorite desserts in one beautiful bake, so you get a tender, lightly chocolatey crumb alongside a rich, tangy cheesecake center.
The texture contrast makes every slice especially satisfying. The cake stays soft and moist while the cheesecake layer adds a smooth, almost melt-in-your-mouth quality. A touch of vanilla rounds out the cocoa flavor, while cream cheese brings just enough tanginess to balance the sweetness.
You will also love how simple the presentation feels. Instead of covering the cake with elaborate frosting, you create an attractive swirl directly in the batter. That means less decorating and more visual impact.
This recipe works wonderfully for Valentine’s Day, Christmas, showers, birthdays, or dinner parties. You can serve it chilled for a firmer cheesecake texture or slightly cool from the refrigerator for an extra creamy bite. Either way, each slice looks special enough for a celebration but feels comforting enough for an ordinary afternoon.
Ingredients
For the red velvet cake, gather 1 1/2 cups (188 g) all-purpose flour, 1 tablespoon (7 g) unsweetened cocoa powder, 1/2 teaspoon baking soda, and 1/4 teaspoon salt. You will also need 1/2 cup (113 g) unsalted butter, softened, 1 cup (200 g) granulated sugar, 2 large eggs, 1 teaspoon vanilla extract, 1/2 cup (120 ml) buttermilk, 1 tablespoon (15 ml) red food coloring, and 1 teaspoon white vinegar.
For the cheesecake swirl, use 8 ounces (226 g) full-fat cream cheese, softened, 1/3 cup (67 g) granulated sugar, 1 large egg yolk, 1 teaspoon vanilla extract, and 2 tablespoons (30 ml) sour cream. Room-temperature dairy ingredients blend much more smoothly, so let the butter and cream cheese soften before mixing.
Pro Tips
First, bring your refrigerated ingredients to room temperature. Softened butter and cream cheese blend smoothly and help prevent lumps. Cold cream cheese can leave small pieces in the cheesecake mixture, which makes the swirl harder to spread evenly.
Second, avoid overmixing the red velvet batter once you add the flour. Mix just until the dry ingredients disappear. Too much mixing can develop excess gluten and make the finished cake less tender. A few tiny streaks of flour can disappear as you gently fold the batter.
Third, create the swirl with a light touch. Drop spoonfuls of cheesecake mixture over the red velvet batter, then gently drag a knife or skewer through the layers. You do not need to make perfect patterns. In fact, random swoops often create the prettiest marble effect.
Finally, watch the baking time closely. The edges should look set while the center remains slightly soft. The cheesecake layer will continue firming as the cake cools, so avoid waiting for the entire surface to look completely dry before removing it from the oven.
Instructions
Step 1: Prepare the Pan
Preheat your oven to 350°F (175°C). Grease an 8-inch or 9-inch round cake pan and line the bottom with parchment paper. Leave a little parchment overhang if you want easier removal later. If you use a springform pan, wrap the outside bottom with foil if you are concerned about leaks.
Step 2: Make the Cheesecake Mixture
Beat the softened cream cheese and granulated sugar until smooth and creamy. Add the egg yolk, vanilla extract, and sour cream. Mix until everything looks silky and well combined. Do not whip the mixture excessively because too much air can create cracks or unevenness during baking. Set the cheesecake mixture aside while you prepare the cake batter.
Step 3: Combine the Dry Ingredients
In a medium bowl, whisk together the flour, cocoa powder, baking soda, and salt. Breaking up the cocoa powder now helps it distribute evenly throughout the batter. Set the bowl aside.
Step 4: Cream the Butter and Sugar
In a large mixing bowl, beat the softened butter and sugar for about 2 to 3 minutes. The mixture should become lighter and fluffy. Add the eggs one at a time, mixing well after each addition. Stir in the vanilla extract.
Step 5: Add the Red Velvet Ingredients
Mix the red food coloring and white vinegar into the buttermilk. Add the dry ingredients to the butter mixture in alternating additions with the buttermilk. Begin and finish with the dry ingredients. Mix gently after each addition and stop as soon as the batter becomes smooth.
Step 6: Layer the Batter
Spread about two-thirds of the red velvet batter into the prepared pan. Spoon the cheesecake mixture over the top, leaving a small border around the edge. Add the remaining red velvet batter in small spoonfuls across the cheesecake layer.
Step 7: Create the Swirl
Take a butter knife or wooden skewer and gently swirl through the batter. Make a few curved motions from the center toward the edges. Keep the movement shallow so you create visible marbling without completely blending the two layers together.
Step 8: Bake the Cake
Place the pan in the preheated oven and bake for approximately 35 to 45 minutes, depending on your pan size and oven. Start checking around the 35-minute mark. The cake should look set around the edges, while the cheesecake portion may still have a slight jiggle in the center.
Step 9: Cool Completely
Remove the cake from the oven and place it on a wire rack. Let it cool in the pan for about 20 minutes. Carefully remove it from the pan and allow it to cool completely before slicing. For the cleanest slices and the creamiest cheesecake texture, refrigerate the cake for at least 1 hour before serving.
Step 10: Slice and Serve
Use a sharp knife to cut the cake into wedges. Wipe the blade clean between cuts for beautifully defined red velvet and cheesecake layers. Serve chilled or allow individual slices to sit at room temperature for several minutes before eating.
Variations
You can easily customize Red Velvet Cheesecake Swirl Cake without losing its signature flavor. For a chocolate-lover’s version, increase the cocoa powder slightly and add a handful of mini chocolate chips to the red velvet batter.
For a citrus twist, add 1 teaspoon of finely grated orange zest to the cheesecake mixture. Orange complements the cocoa and vanilla beautifully and gives the cake a festive flavor.
You can also make a gluten-free version by replacing the all-purpose flour with a reliable 1-to-1 gluten-free baking flour. Choose a blend that contains xanthan gum for the best texture.
For extra indulgence, serve each slice with a spoonful of whipped cream, fresh strawberries, or a light drizzle of melted white chocolate. These additions create an elegant dessert without requiring complicated decoration.
Storage and Serving
Store leftover Red Velvet Cheesecake Swirl Cake in an airtight container in the refrigerator for up to 4 days. Because the recipe contains cream cheese, keep it chilled whenever you are not serving it. Let the cake sit at room temperature for about 10 to 15 minutes before serving if you prefer a softer texture.
For a special dessert plate, serve a slice with lightly sweetened whipped cream and fresh berries. Strawberries, raspberries, and cherries pair particularly well with the cocoa-rich red velvet flavor.
You can also dust the top with powdered sugar just before serving for a simple finish. If you are preparing the cake for a party, chill it overnight and slice it shortly before guests arrive. The flavors become even more balanced after resting, and the cheesecake swirl becomes wonderfully creamy.
FAQs
1. Can I make this cake ahead of time?
Yes. You can prepare it one day ahead and keep it refrigerated. In fact, chilling overnight can improve the texture and make slicing easier.
2. Why did my cheesecake swirl disappear?
The swirl may disappear if you overmix the layers. Use only a few gentle strokes with a knife or skewer to create visible ribbons.
3. Can I use low-fat cream cheese?
You can, but full-fat cream cheese gives the cheesecake layer a richer flavor and smoother texture. Low-fat varieties may produce a slightly softer filling.
4. How do I know when the cake is done?
The edges should look firm, while the center can have a very slight jiggle. A toothpick inserted into the red velvet portion should come out with a few moist crumbs rather than wet batter.
5. Can I freeze this cake?
Yes. Wrap individual slices tightly in plastic wrap, then place them in a freezer-safe container. Freeze for up to 2 months. Thaw overnight in the refrigerator before serving.
This Red Velvet Cheesecake Swirl Cake is comfort food at its finest, combining tender cocoa-kissed red velvet cake with a rich, creamy cheesecake swirl and a beautiful marbled finish. It’s the kind of dish that turns an ordinary dessert table into something memorable, whether you’re celebrating a holiday, hosting friends, or simply craving a special homemade treat. With its striking appearance, balanced sweetness, and irresistible texture contrast, this cake deserves a place in your regular baking rotation. Slice it chilled, add a little whipped cream, and enjoy every creamy, velvety bite.
Print
Red Velvet Cheesecake Swirl Cake
- Total Time: 10 minutes
Description
Red velvet meets creamy cheesecake in this gorgeous swirl cake. Every slice delivers a soft, chocolatey crumb and a rich cheesecake center that makes any occasion feel extra special.
Ingredients
- 1 1/2 cups (188 g) all-purpose flour
- 1 tablespoon (7 g) unsweetened cocoa powder
- 1/2 teaspoon baking soda
- 1/4 teaspoon salt
- 1/2 cup (113 g) unsalted butter, softened
- 1 cup (200 g) granulated sugar
- 2 large eggs
- 1 teaspoon vanilla extract
- 1/2 cup (120 ml) buttermilk
- 1 tablespoon (15 ml) red food coloring
- 1 teaspoon white vinegar
- 8 ounces (226 g) full-fat cream cheese, softened
- 1/3 cup (67 g) granulated sugar
- 1 large egg yolk
- 1 teaspoon vanilla extract
- 2 tablespoons (30 ml) sour cream
Instructions
- Preheat the oven to 350°F (175°C), grease an 8-inch or 9-inch cake pan, and line the bottom with parchment paper.
- Beat softened cream cheese with sugar until smooth, then mix in the egg yolk, vanilla, and sour cream.
- Whisk flour, cocoa powder, baking soda, and salt together in a separate bowl.
- Beat softened butter and sugar until light and fluffy, then add the eggs one at a time and mix in vanilla.
- Combine the buttermilk, red food coloring, and vinegar.
- Add the dry ingredients to the butter mixture alternately with the buttermilk mixture, mixing gently until just combined.
- Spread two-thirds of the red velvet batter into the prepared pan.
- Spoon the cheesecake mixture over the batter, then add the remaining red velvet batter in small spoonfuls.
- Gently swirl the layers with a knife or skewer to create a marbled pattern.
- Bake for 35 to 45 minutes, until the edges are set and the center has a slight jiggle.
- Cool the cake in the pan for 20 minutes, then transfer it to a rack and cool completely.
- Refrigerate for at least 1 hour before slicing and serving
- Prep Time: 10
- Category: Baking