
Introduction
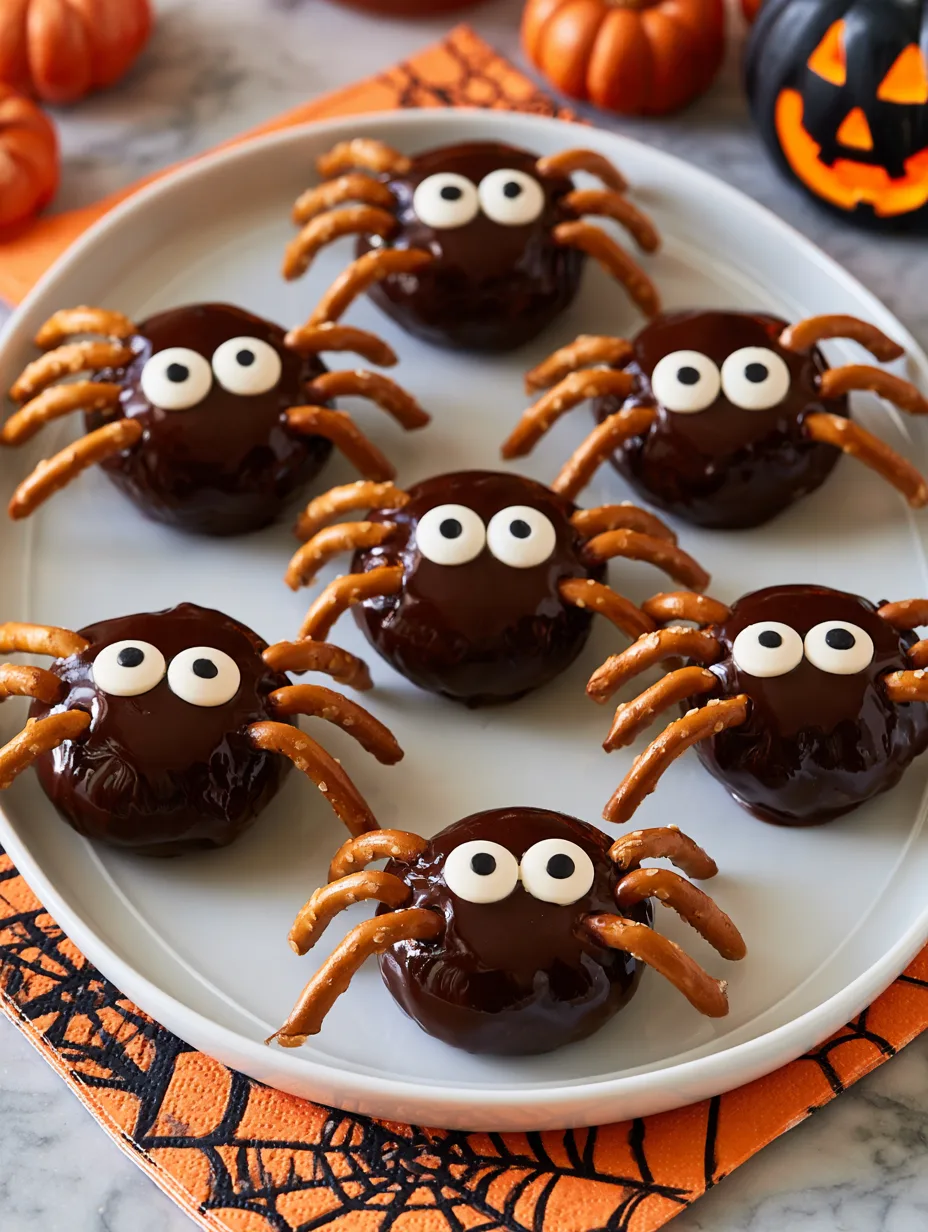
Crispy apples become delightfully spooky in this Easy Halloween Spider Apples Recipe, a playful treat that turns fresh fruit into creepy-cute party food. Juicy apple slices pair with chocolate, crunchy pretzels, and candy eyes to create little edible spiders that look impressive without complicated decorating skills. They make a fantastic Halloween snack for kids, classroom parties, family gatherings, or festive dessert tables. Best of all, you can assemble them quickly with simple ingredients. You’ll learn how to make adorable spider apples that are fun to eat and easy to customize.
Why You’ll Love This Recipe
This Easy Halloween Spider Apples Recipe brings together everything you want in a festive Halloween treat: bright, crisp fruit, creamy chocolate, crunchy pretzels, and a playful presentation. The contrast between juicy apples and crisp pretzel legs makes every bite more interesting, while the chocolate adds just enough sweetness.
You also don’t need baking skills or special equipment. Simply slice the apples, prepare the chocolate, and assemble your spiders. Kids can help with arranging the legs and adding candy eyes, making this recipe an entertaining family activity.
These spooky apple snacks also offer a lighter alternative to traditional Halloween candy. You can keep them simple with dark chocolate and apples or make them more indulgent with caramel drizzle, sprinkles, or mini candies.
Whether you’re planning a Halloween party or looking for an after-school snack, these edible spiders deliver plenty of festive charm with very little effort.
Ingredients
For approximately 8 spider apple snacks, gather these simple ingredients:
- 2 large apples (about 350 g total), such as Granny Smith, Honeycrisp, or Fuji
- ½ cup (85 g) semi-sweet chocolate chips, for dipping or drizzling
- 16 small candy eyes, for the spider faces
- 32 small pretzel sticks (about 30 g), broken into shorter pieces for spider legs
- 2 tablespoons (30 g) creamy peanut butter, optional for extra flavor and helping decorations stick
- 1 tablespoon (15 g) mini chocolate chips, optional for additional details
- 1 teaspoon (5 ml) lemon juice, to help prevent apple slices from browning
Choose firm apples because they hold their shape better during assembly. Tart apples create a particularly delicious contrast with sweet chocolate and candy decorations.
Pro Tips
1. Keep the apple slices dry. After brushing the slices lightly with lemon juice, pat them gently with a paper towel. Excess moisture can make chocolate decorations slide around.
2. Melt chocolate slowly. Place the chocolate chips in a microwave-safe bowl and heat them in short 15-second bursts. Stir between each burst until smooth. Avoid overheating because chocolate can become thick and difficult to work with.
3. Assemble while the chocolate remains soft. Add the pretzel legs and candy eyes before the chocolate sets. If you’re making several spiders, decorate a few at a time rather than coating everything first.
For especially neat results, use a small piping bag or zip-top bag with a tiny corner snipped off. You can drizzle chocolate precisely and create tiny details without making a mess.
For parties, prepare all your ingredients before slicing the apples. This keeps assembly quick and helps the fruit stay fresh and crisp.
Step-by-Step Instructions
Step 1: Prepare the Apples
Wash and dry the apples thoroughly. Cut each apple into thick slices or wedges, depending on the shape you prefer. Aim for pieces about ½ inch thick so they remain sturdy enough to decorate.
Immediately brush the cut surfaces lightly with lemon juice. Don’t soak them because too much liquid can affect the chocolate.
Step 2: Prepare the Pretzel Legs
Break the pretzel sticks into smaller pieces. Each spider needs four legs on each side, so prepare eight small pieces per spider.
You don’t need every piece to have the exact same length. Slight variations actually make the spiders look more playful and natural.
Step 3: Melt the Chocolate
Place the semi-sweet chocolate chips in a microwave-safe bowl. Heat for 15 seconds, stir thoroughly, and continue heating in short intervals until completely smooth.
If you prefer, melt the chocolate over a double boiler. Keep the heat low and stir continuously.
Step 4: Add the Chocolate
Dip one side of each apple slice into the melted chocolate, or drizzle chocolate across the top. You don’t need perfect coverage. A messy chocolate coating can give your Halloween spiders extra personality.
If you’re using peanut butter, spread a very thin layer over the apple first, then add chocolate on top.
Step 5: Build the Spider Legs
While the chocolate remains soft, carefully insert four pretzel pieces along each side of the apple. Space them evenly enough to resemble spider legs.
If the pretzels don’t stay in place, add a tiny dab of melted chocolate underneath each piece. Let it sit for a few seconds before moving the apple.
Step 6: Add the Eyes
Place two candy eyes near the front of each apple slice. Gently press them into the chocolate before it sets.
For a silly expression, slightly angle the eyes. For a more traditional spider appearance, position them evenly.
Step 7: Let the Spiders Set
Transfer the finished apple spiders to a parchment-lined plate or tray. Refrigerate them for about 10 to 15 minutes, just until the chocolate firms.
Don’t leave them uncovered in the refrigerator for too long because apples can absorb moisture and lose their fresh texture.
Step 8: Serve and Enjoy
Arrange the finished spiders on a Halloween platter. Add extra pretzels, candy eyes, or colorful sprinkles around the plate for decoration.
Serve them soon after assembling for the best combination of crisp apples, crunchy pretzels, and smooth chocolate.
Variations
You can easily personalize this Easy Halloween Spider Apples Recipe for different tastes and dietary needs.
For a caramel apple version, drizzle the finished spiders with warm caramel before adding the eyes. The caramel creates a deliciously chewy layer.
For a nut-free version, skip peanut butter and use melted chocolate as the edible glue for the decorations. Check your pretzels and chocolate labels if you’re preparing treats for a school or allergy-sensitive event.
For extra spooky spiders, use white chocolate instead of semi-sweet chocolate and add dark chocolate pupils to the candy eyes. You can also use green or purple candy melts for colorful Halloween designs.
If you want a simpler fruit treat, replace the chocolate coating with a thin chocolate drizzle. The apples will stay lighter while still looking festive.
Storage and Serving
For the freshest texture, serve these apple spiders shortly after assembling. If you need to prepare them ahead, arrange them in a single layer on a parchment-lined tray and refrigerate for up to 4 hours.
Avoid stacking the decorated apples because the pretzel legs can break and the chocolate decorations may smear.
Serve your Easy Halloween Spider Apples Recipe on a large Halloween platter surrounded by extra candy eyes and pretzels. They also look adorable alongside popcorn, fruit cups, mini sandwiches, or other spooky snacks.
For parties, place one or two spiders into individual cupcake liners. This makes them easy for guests to grab without touching the entire platter.
If you’re serving children, consider using smaller apple slices and shortening the pretzel legs slightly to make the treats easier to handle.
FAQs
1. What apples work best for spider apples?
Firm varieties such as Granny Smith, Honeycrisp, and Fuji work well. They stay crisp and hold their shape during decorating.
2. Can I make these spider apples ahead of time?
Yes. Prepare them up to about four hours ahead and refrigerate them in a single layer. For the freshest texture, serve them the same day.
3. How do I stop apples from turning brown?
Lightly brush the cut surfaces with lemon juice. Pat them dry before decorating so excess moisture doesn’t interfere with the chocolate.
4. Can I use candy melts instead of chocolate chips?
Absolutely. Candy melts come in many Halloween-friendly colors and are especially convenient when you want bright purple, green, orange, or white spiders.
5. Are these suitable for a Halloween classroom party?
They can be, but check the school’s allergy rules first. For nut-free settings, leave out peanut butter and verify that your chocolate and pretzels are appropriate.
This Easy Halloween Spider Apples Recipe is comfort food at its finest — a crisp, chocolatey, spooky-cute treat that makes fresh apples feel party-ready. It’s the kind of snack that turns ordinary Halloween gatherings into memorable celebrations without requiring hours in the kitchen. Kids will love decorating their own spiders, while adults will appreciate how quickly everything comes together. With crunchy pretzel legs, sweet chocolate, juicy apples, and silly candy eyes, every bite brings a fun mix of textures and flavors. Make a batch for your next Halloween party, movie night, classroom celebration, or family snack table.
Print
Easy Halloween Spider Apples Recipe
- Total Time: 45
Description
Turn ordinary apples into the cutest spooky snack of the season. These Halloween spider apples are creepy, crunchy, chocolatey, and guaranteed to steal the spotlight.
Ingredients
- 2 large apples (about 350 g total)
- 1/2 cup (85 g) semi-sweet chocolate chips
- 16 small candy eyes
- 32 small pretzel sticks (about 30 g)
- 2 tablespoons (30 g) creamy peanut butter, optional
- 1 tablespoon (15 g) mini chocolate chips, optional
- 1 teaspoon (5 ml) lemon juice
Instructions
- Wash and dry the apples, then cut them into thick slices or wedges.
- Lightly brush the cut apple surfaces with lemon juice and pat dry.
- Break the pretzel sticks into small pieces for the spider legs.
- Melt the chocolate chips in short microwave intervals, stirring until smooth.
- Dip or drizzle each apple slice with melted chocolate.
- Arrange four pretzel pieces on each side of the apple to create spider legs.
- Add two candy eyes to each spider while the chocolate is still soft.
- Place the decorated apples on a parchment-lined tray.
- Refrigerate for 10 to 15 minutes until the chocolate sets.
- Serve immediately for the best crisp texture.
- Prep Time: 15
- Category: Cooking
- Cuisine: American