
Introduction
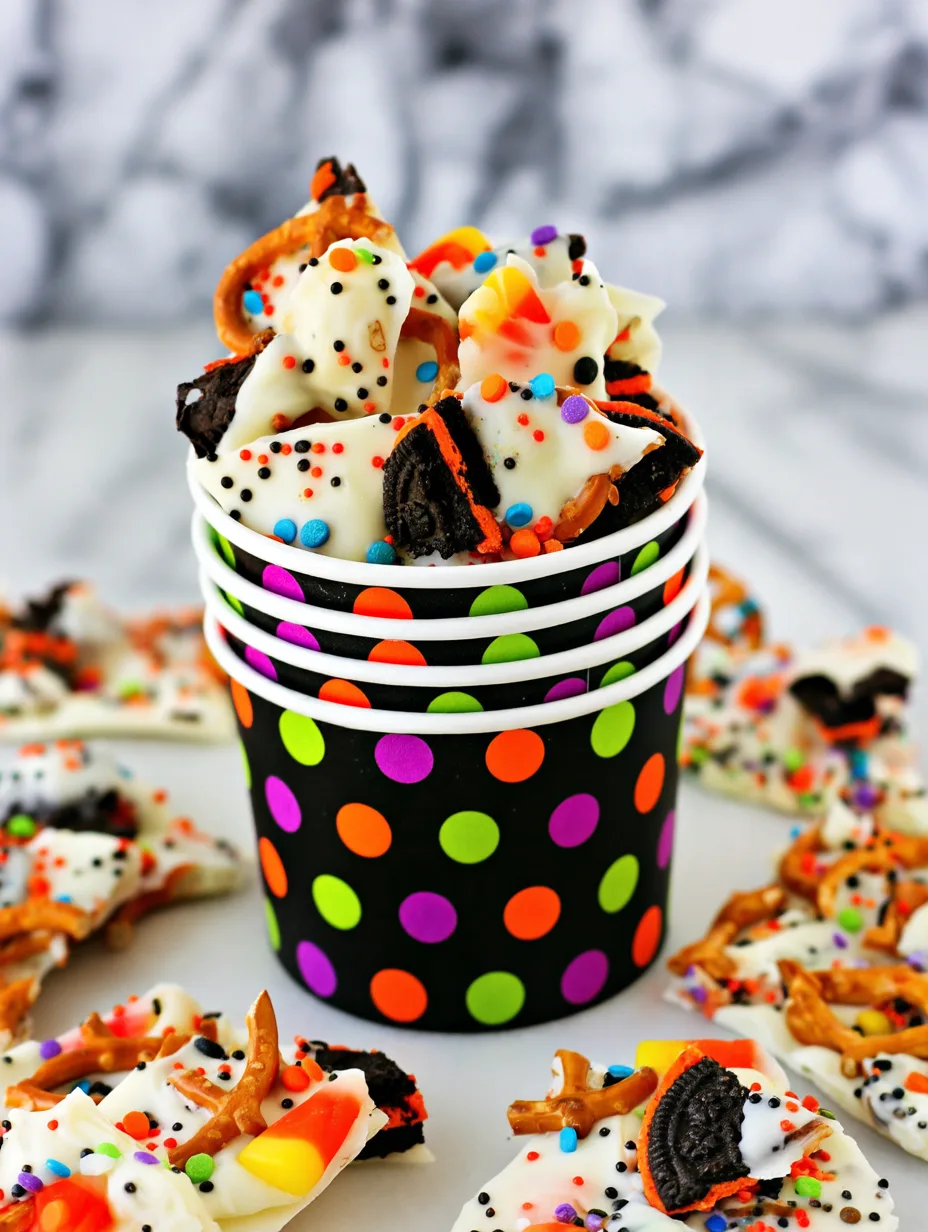
Crunchy, colorful, and wonderfully sweet, Halloween Bark is the ultimate no-bake treat for spooky season! This festive chocolate dessert combines smooth melted chocolate with playful Halloween candies, candy eyes, and sprinkles to create a delicious treat that looks as exciting as it tastes. Whether you’re preparing snacks for a Halloween party, filling treat bags, or making a fun dessert with the kids, this recipe keeps things simple and stress-free. You’ll learn how to make Halloween Bark with easy ingredients, creative decorations, and foolproof tips for perfect results every time.
Why You’ll Love This Recipe
Halloween Bark brings everything you love about Halloween desserts into one easy, customizable treat. You don’t need an oven, complicated equipment, or advanced baking skills. Just melt chocolate, spread it onto a tray, add your favorite decorations, and let it set.
The best part is the contrast of textures. Creamy chocolate provides a smooth base, while crunchy candy pieces, colorful sprinkles, and crispy chocolate candies add delightful bites throughout. Candy eyes and seasonal decorations give each piece a spooky personality, making this dessert as entertaining to look at as it is to eat.
This recipe also works beautifully as a family activity. Children can choose their favorite toppings and help decorate the chocolate before it sets. Every batch can look completely different, so you can create ghosts, monsters, pumpkins, or a colorful Halloween candy mix.
You can also prepare this treat ahead of time, which makes party planning easier. Break the chilled chocolate into irregular pieces, arrange them on a platter, and enjoy a festive dessert that looks impressive with very little effort.
Ingredients
You only need a handful of ingredients to create delicious, colorful Halloween Bark. Choose good-quality chocolate for the best flavor and texture.
-
12 oz (340 g) semi-sweet chocolate chips: Create a rich, balanced chocolate base that pairs well with sweet decorations.
-
8 oz (225 g) white chocolate chips: Add a contrasting layer or decorative drizzles for a festive appearance.
-
1/2 cup (75 g) Halloween candy-coated chocolates: Provide bright colors and a satisfying crunch.
-
1/4 cup (40 g) orange and black sprinkles: Give the bark a classic Halloween look.
-
2 tablespoons (20 g) mini chocolate candies: Add extra texture and small bursts of chocolate flavor.
-
24 candy eyes: Turn ordinary chocolate pieces into playful monsters and spooky characters.
-
1/4 cup (40 g) crushed chocolate sandwich cookies: Add a crunchy, cookie-filled element.
-
1/2 teaspoon vanilla extract (optional): Adds a subtle aromatic note to the chocolate.
Ingredient note: You can use all semi-sweet chocolate or all white chocolate if you prefer. Choose toppings that complement your chocolate and avoid adding too many large candies, which can make the bark difficult to break.
Pro Tips
A few simple techniques will help you make smooth, attractive Halloween Bark with a satisfying snap and decorations that stay in place.
1. Melt the chocolate gently.
Chocolate can burn or become grainy when exposed to excessive heat. Microwave the chocolate in a dry, microwave-safe bowl in 20- to 30-second intervals, stirring thoroughly after each interval. Stop heating when a few small pieces remain, then stir until the residual heat melts them. Always keep water away from the chocolate because even a small amount can cause it to seize.
2. Prepare your decorations before melting.
Once the chocolate melts, you need to work quickly. Measure the candies, crush the cookies, and arrange the sprinkles before you begin. Line a baking sheet with parchment paper or a silicone baking mat so you can spread the chocolate without worrying about sticking.
3. Add toppings while the chocolate remains soft.
Press larger candies and candy eyes gently into the melted chocolate. Scatter smaller sprinkles across the surface, distributing the colors evenly. If you want a marbled effect, drizzle melted white chocolate over the dark chocolate and swirl it lightly with a toothpick. Avoid excessive swirling, which can muddy the colors.
For the cleanest finish, let the bark set completely before breaking it into pieces. Gentle handling helps preserve the decorations and gives each piece an attractive, homemade appearance.
Step-by-Step Instructions
Making Halloween Bark is easy, and each step gives you an opportunity to customize the finished treat. Follow these instructions for a colorful dessert with a smooth chocolate base and plenty of crunchy toppings.
Step 1: Prepare your baking sheet.
Line a large baking sheet with parchment paper or a silicone baking mat. Make sure the paper lies relatively flat so the chocolate spreads evenly. Gather your candy-coated chocolates, sprinkles, candy eyes, crushed cookies, and white chocolate before starting.
If you’re making this recipe with children, let them arrange the decorations in small bowls. This keeps everything organized and makes the decorating stage more enjoyable.
Step 2: Melt the semi-sweet chocolate.
Place the semi-sweet chocolate chips in a microwave-safe bowl. Microwave for 20 to 30 seconds, then stir. Continue heating in short intervals, stirring each time until the chocolate becomes smooth and glossy.
You can also melt the chocolate in a heatproof bowl set over a saucepan of gently simmering water. Keep the bottom of the bowl above the water, and make sure no steam or water enters the chocolate.
Step 3: Spread the chocolate.
Pour the melted semi-sweet chocolate onto the prepared baking sheet. Use a silicone spatula or the back of a spoon to spread it into an even layer about 1/4 inch (6 mm) thick.
Don’t worry about creating a perfect rectangle. A slightly irregular shape gives the finished bark a rustic, homemade appearance. However, try to maintain an even thickness so the chocolate sets consistently.
Step 4: Melt the white chocolate.
Place the white chocolate chips in a separate clean bowl. Microwave them in 15- to 20-second intervals, stirring frequently. White chocolate scorches more easily than semi-sweet chocolate, so use gentle heat and stop as soon as it melts.
Drizzle the white chocolate over the dark base in thin lines. Use a toothpick or skewer to create gentle swirls, zigzags, or a marbled pattern. You can skip this step if you prefer a single-color chocolate base.
Step 5: Add the Halloween decorations.
While the chocolate remains soft, scatter the candy-coated chocolates, mini chocolate candies, crushed cookies, and orange and black sprinkles across the surface.
Place candy eyes in small clusters to create monster faces. You can arrange two eyes together for simple characters or combine them with colored candies to suggest silly expressions. Press larger decorations gently into the chocolate so they adhere as it sets.
Try to distribute the toppings evenly. Each piece should contain a little chocolate, a few colorful decorations, and some crunch.
Step 6: Chill until firm.
Transfer the baking sheet to the refrigerator for approximately 30 to 45 minutes, or until the chocolate feels completely firm. The exact time depends on the thickness of the chocolate and the temperature of your refrigerator.
Avoid moving the tray too much while the chocolate sets. If you prefer to let the bark harden at room temperature, allow extra time in a cool, dry room.
Step 7: Break and serve.
Remove the firm chocolate from the refrigerator and lift it away from the parchment paper. Break it into irregular pieces using your hands or cut it gently with a large knife.
Arrange the finished Halloween Bark on a serving platter, or divide it into small portions for party favors and treat bags. For the best presentation, choose pieces with a variety of colors and decorations.
Variations
One of the best things about Halloween Bark is how easily you can adapt it to different tastes, themes, and dietary preferences.
1. White Chocolate Monster Bark
Use white chocolate as the main base and add candy eyes, colorful candy-coated chocolates, and bright green or purple sprinkles. A few drops of orange-colored candy melts can create contrasting swirls. This version looks especially fun when you arrange the eyes in clusters to create friendly monsters.
2. Peanut Butter Chocolate Bark
Swirl two tablespoons of smooth peanut butter into the melted semi-sweet chocolate before adding the toppings. Sprinkle chopped peanut butter cups over the surface for a richer flavor and extra crunch. If serving guests, clearly label the bark because peanuts are a common allergen.
3. Vegan Halloween Bark
Choose certified vegan dark chocolate and plant-based candy decorations. Check the labels on your sprinkles and candies because some contain milk ingredients, gelatin, or other animal-derived ingredients. Use dairy-free white chocolate or vegan candy melts for decorative drizzles.
You can also experiment with pretzel pieces, toasted pumpkin seeds, or dried cranberries for different textures. Keep the decorations relatively small so you can break the bark easily and serve manageable portions.
Storage and Serving
Proper storage keeps Halloween Bark crisp, attractive, and ready for parties, lunchbox treats, or homemade gifts.
How to store it: Place the fully set chocolate pieces in an airtight container. Separate layers with parchment paper to protect the decorations and prevent pieces from sticking together. Store the container in a cool, dry place away from direct sunlight and heat. Depending on the chocolate and room temperature, the bark may keep well for about one to two weeks.
If your kitchen feels warm, refrigerate the bark in an airtight container. Let the container sit briefly before opening it so condensation doesn’t form directly on the chocolate. Moisture can affect the finish and make the surface less appealing.
Can you freeze it? Yes. Place the pieces in a freezer-safe airtight container, with parchment between the layers, and freeze for up to two months for best quality. Thaw them in the refrigerator before bringing the closed container to room temperature.
Serving suggestions:
-
Halloween party platter: Combine the bark with popcorn, cookies, and other seasonal sweets.
-
Treat bags: Wrap individual pieces in food-safe bags and tie them with festive ribbons.
-
Dessert topping: Break the bark into small chunks and sprinkle them over ice cream, cupcakes, or brownies just before serving.
For parties, keep the bark away from warm serving areas so it retains its shape.
Frequently Asked Questions
1. Can I make Halloween Bark ahead of time?
Absolutely! Make it one to two days before your event, then store it in an airtight container in a cool place. This frees up time for other party preparations.
2. Why did my chocolate turn thick and grainy?
Chocolate often seizes when water enters the bowl, or it can become grainy from overheating. Use completely dry equipment, heat in short intervals, and stir frequently. If the chocolate has seized, it may not work well as a bark base.
3. Do I have to use two kinds of chocolate?
No. You can use only semi-sweet chocolate, milk chocolate, or white chocolate. Two varieties simply create a more colorful appearance and give you extra options for decorative swirls.
4. How do I keep the candy decorations from falling off?
Add the decorations while the chocolate is still soft. Gently press larger candies and candy eyes into the surface instead of leaving them loose on top. Let the bark set completely before breaking it.
5. Can I make this recipe without a microwave?
Yes. Melt the chocolate in a heatproof bowl over a saucepan of gently simmering water. Stir regularly and keep the bowl away from direct contact with the water. Dry the underside of the bowl before pouring the chocolate onto your baking sheet.
This Halloween Bark is festive fun at its finest, with silky chocolate, crunchy candy pieces, playful candy eyes, and colorful sprinkles in every bite. It’s the kind of treat that brings everyone together, whether you’re hosting a spooky Halloween party, preparing homemade gifts, or enjoying a creative afternoon with the kids. Best of all, you can customize every batch to match your favorite flavors and Halloween colors. Make it ahead, break it into bite-sized pieces, and watch this cheerful chocolate treat disappear from the dessert table. It’s an easy, delicious way to make Halloween a little sweeter.
Print
Halloween Bark
- Total Time: 45
Description
A little chocolate, a handful of colorful candies, and plenty of spooky decorations make this Halloween Bark a party favorite. Create a festive no-bake treat that’s crunchy, sweet, and easy to customize for your next Halloween celebration.
Ingredients
- 12 oz (340 g) semi-sweet chocolate chips
- 8 oz (225 g) white chocolate chips
- 1/2 cup (75 g) Halloween candy-coated chocolates
- 1/4 cup (40 g) orange and black sprinkles
- 2 tablespoons (20 g) mini chocolate candies
- 24 candy eyes
- 1/4 cup (40 g) crushed chocolate sandwich cookies
- 1/2 teaspoon vanilla extract (optional)
Instructions
- Line a baking sheet with parchment paper or a silicone baking mat.
- Melt the semi-sweet chocolate chips in a microwave-safe bowl in 20- to 30-second intervals, stirring between each interval until smooth.
- Spread the melted semi-sweet chocolate into an even layer about 1/4 inch (6 mm) thick on the prepared baking sheet.
- Melt the white chocolate chips in a separate bowl using 15- to 20-second microwave intervals, stirring frequently.
- Drizzle the melted white chocolate over the semi-sweet chocolate and swirl gently with a toothpick if desired.
- Sprinkle the candy-coated chocolates, mini chocolate candies, crushed cookies, and Halloween sprinkles over the chocolate.
- Arrange the candy eyes on top and gently press larger decorations into the soft chocolate.
- Refrigerate for 30 to 45 minutes, or until the chocolate is completely firm.
- Remove the bark from the parchment paper and break it into irregular pieces.
- Serve immediately or store in an airtight container in a cool, dry place.
- Prep Time: 25
- Category: cookies
- Cuisine: amircain