
Introduction
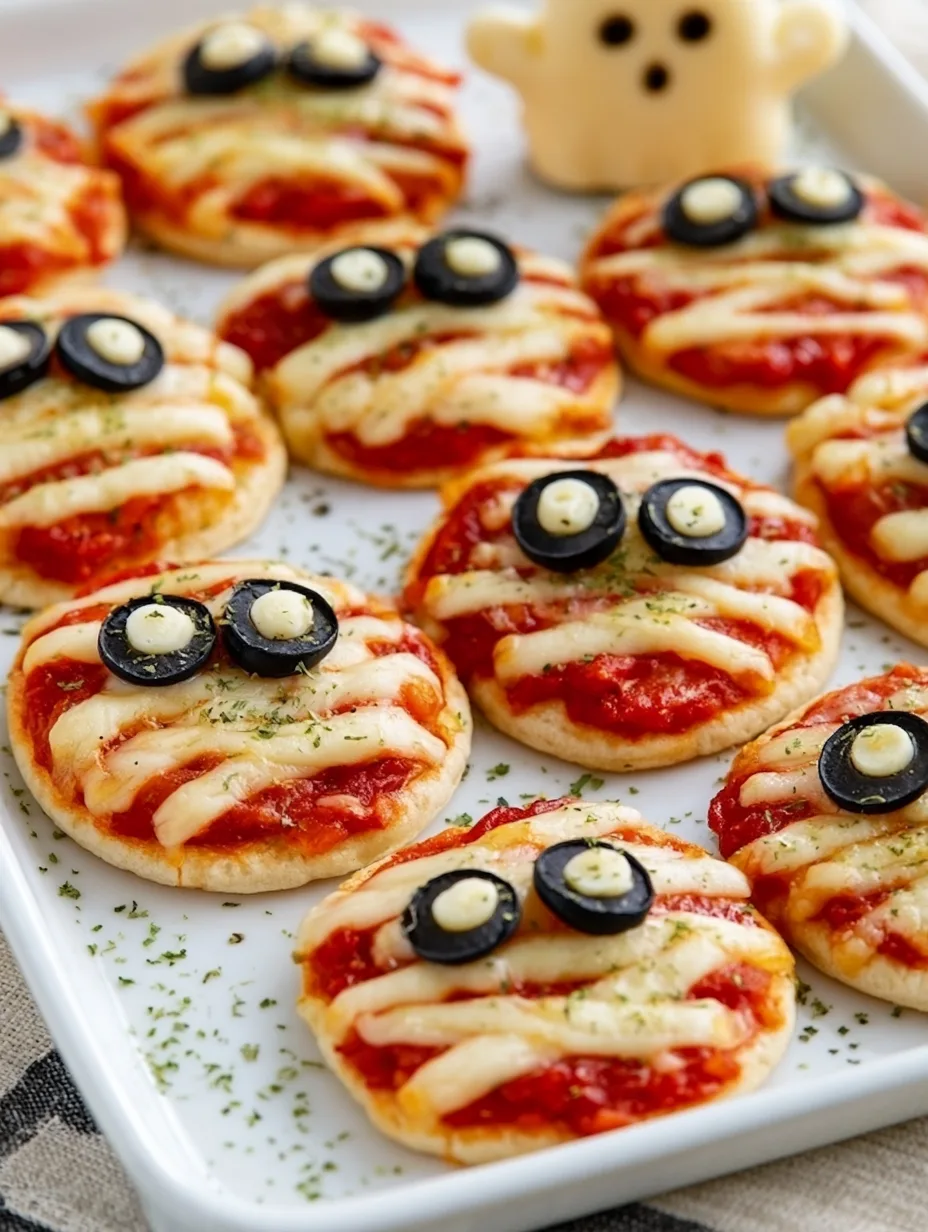
Crispy, cheesy, and adorably spooky, Mummy Mini Pizzas turn simple pizza night into a Halloween treat everyone will want to grab. Each little pizza features a golden crust, rich tomato sauce, bubbling mozzarella, and playful cheese strips that create a mummy-like appearance. They are quick enough for a busy weeknight but festive enough for a Halloween party, classroom celebration, or family movie night. Best of all, kids can help decorate their own pizzas before they go into the oven. You’ll learn how to make these fun, flavorful mini pizzas with simple ingredients and easy techniques.
Why You’ll Love This Recipe
Mummy Mini Pizzas combine everything people love about homemade pizza with a fun Halloween twist. The crust bakes until lightly crisp around the edges while staying soft and chewy in the center. Rich pizza sauce adds bright tomato flavor, while melted mozzarella creates a creamy, stretchy layer underneath the decorative cheese strips.
The best part is the texture contrast. You get crisp edges, tender dough, silky melted cheese, and a slightly chewy bite all in one little pizza. The mummy design also makes these pizzas feel special without requiring complicated decorating skills.
They work especially well for parties because everyone can customize their own. Add pepperoni, olives, mushrooms, or a sprinkle of Italian seasoning before creating the cheese “bandages.” The preparation stays simple, and the pizzas cook quickly.
Whether you’re feeding hungry kids or serving adults who love playful holiday food, these mini Halloween pizzas deliver plenty of flavor with very little fuss.
Ingredients
For about 8 mini pizzas, gather:
- 1 lb. (450 g) refrigerated pizza dough, divided into 8 portions
- 1/2 cup (120 ml) pizza sauce, smooth or chunky
- 1 1/2 cups (170 g) shredded mozzarella cheese
- 1/4 cup (25 g) finely shredded Parmesan cheese
- 1 tablespoon (15 ml) olive oil, for brushing
- 1/2 teaspoon (2 g) Italian seasoning
- 1/4 teaspoon (1 g) garlic powder
- 16 small black olive slices, for mummy eyes
- 1/4 teaspoon (1 g) salt, optional
Use low-moisture mozzarella for the best melting and browning. Refrigerated pizza dough keeps preparation quick, but homemade dough works beautifully too. Choose a thick pizza sauce that won’t make the dough soggy. For the eyes, black olives create a classic spooky look, although small pieces of pepper or another dark topping can also work.
Pro Tips
First, Mummy Mini Pizzas bake best when you preheat the oven thoroughly. A hot oven helps the dough puff quickly and creates a crisp bottom before the cheese has time to overcook. If you have a pizza stone or heavy baking sheet, preheat it as well.
Second, avoid adding too much sauce. A thin, even layer gives the crust enough moisture and flavor without making the center soft. Leave a small border around each piece of dough so the edges can brown nicely.
Third, pay attention to the cheese strips. Instead of covering each pizza with one thick layer of shredded cheese, arrange narrow strips of mozzarella across the sauce with small gaps between them. Crisscross some strips slightly to create an authentic mummy-wrap appearance. Add the olive eyes after arranging the cheese so they remain visible.
For extra golden edges, lightly brush the exposed crust with olive oil before baking. Let the finished pizzas rest for two or three minutes before serving. The cheese will settle slightly, making the pizzas easier to handle.
Step-by-Step Instructions
Step 1: Prepare the oven and baking sheet
Preheat your oven to 425°F (220°C). Line a large baking sheet with parchment paper or lightly grease it with olive oil. If you’re using a pizza stone, place it in the oven while it heats.
Give the oven plenty of time to reach temperature. Starting with a fully heated oven helps the mini crusts become crisp instead of pale or chewy.
Step 2: Divide the dough
Place the pizza dough on a lightly floured surface. Divide it into eight equal portions. Roll or gently stretch each portion into a small oval or circle about 4 to 5 inches wide.
Don’t worry about perfect shapes. Slightly uneven edges make the pizzas look homemade and give each mummy its own personality.
Transfer the dough rounds to the prepared baking sheet, leaving a little space between each one.
Step 3: Add the sauce
Spread about 1 tablespoon of pizza sauce over each dough round. Use the back of a spoon to create a thin, even layer.
Leave approximately 1/2 inch (1 cm) around the edge uncovered. This border becomes the golden crust and gives you something easy to hold when the pizzas are ready.
Step 4: Add seasoning and Parmesan
Sprinkle the pizzas lightly with Italian seasoning and garlic powder. Add a small amount of Parmesan over the sauce.
These simple additions deepen the flavor without competing with the mozzarella or spooky design.
Step 5: Create the mummy bandages
Now comes the fun part. Take the shredded mozzarella and separate some of it into thin, short strips. Lay the strips across each pizza at different angles, leaving narrow gaps between them.
Don’t make the strips perfectly straight. Slightly crooked pieces create a more playful mummy appearance. Keep some sauce visible between the cheese strips so the design stays recognizable.
Step 6: Add the eyes
Place two small black olive slices near the upper portion of each pizza. Position them in the gaps between the cheese strips so they look like little eyes peeking through the mummy wrapping.
For a more expressive design, slightly tilt one eye on a few pizzas.
Step 7: Bake
Lightly brush the exposed dough edges with olive oil. Place the baking sheet in the preheated oven and bake for approximately 10 to 14 minutes, or until the crust is golden and the cheese has melted.
Cooking time can vary depending on dough thickness and oven temperature, so start checking around the 10-minute mark. If you prefer extra-crispy edges, give the pizzas another minute or two.
Step 8: Cool and serve
Remove the pizzas from the oven and let them cool for 2 to 3 minutes. This short rest helps the cheese set slightly while keeping the crust warm.
Serve the Mummy Mini Pizzas while they’re hot and gooey. Arrange them on a large platter for a Halloween party, or let everyone grab their favorite mummy straight from the baking sheet.
Variations
There are plenty of ways to customize these spooky little pizzas. For a meatier version, add tiny pieces of pepperoni underneath the mozzarella strips. Cooked crumbled sausage also works well and adds extra savory flavor.
For a vegetarian option, add finely chopped mushrooms, bell peppers, spinach, or black olives beneath the cheese. Keep vegetable pieces small so they don’t interfere with the mummy design.
You can also make gluten-free Mummy Mini Pizzas by using your favorite gluten-free pizza dough. For a dairy-free version, choose a dairy-free pizza cheese that melts well.
If you’re serving very young children, replace olive slices with tiny pieces of bell pepper or another familiar topping. You can even let everyone create a different facial expression using the toppings.
Storage and Serving
Store leftover Mummy Mini Pizzas in an airtight container in the refrigerator for up to 3 days. Place parchment paper between layers if you’re stacking several pizzas to prevent the cheese from sticking.
For the best texture, reheat them in a 375°F (190°C) oven or air fryer until the crust becomes crisp and the cheese is hot. A microwave works for convenience, but the crust will become softer.
Serve these Halloween pizzas with a simple green salad, vegetable sticks, or fresh fruit for a balanced meal. For parties, arrange them on a large platter alongside popcorn, Halloween cookies, or other finger foods.
You can also serve marinara or pizza sauce on the side for dipping. Kids especially enjoy dipping the crispy crust edges into warm sauce.
FAQs
1. Can I make these pizzas ahead of time?
Yes. Assemble them several hours ahead, cover them, and refrigerate until you’re ready to bake. Add the olive eyes just before baking for the best appearance.
2. Can I use homemade pizza dough?
Absolutely. Homemade dough works well, although you should keep the pieces relatively thin so the mini pizzas cook evenly.
3. How do I make the mummy cheese strips?
Use low-moisture mozzarella and pull or cut it into narrow strips. Arrange them at different angles with small gaps between each strip.
4. Can I freeze these pizzas?
Yes. Bake them, let them cool completely, then freeze them in a single layer before transferring them to a freezer-safe container. Reheat directly from frozen until hot.
5. Can I use a different cheese?
Yes. Provolone, Monterey Jack, or a pizza cheese blend can work. Mozzarella remains the easiest choice because it melts smoothly and creates a classic pizza finish.
This Mummy Mini Pizzas recipe is comfort food at its finest — crispy around the edges, gooey in the middle, and dressed up with a delightfully spooky Halloween design. It’s the kind of dish that makes ordinary pizza night feel like a celebration, whether you’re hosting a Halloween party, planning a family movie night, or looking for a fun kid-friendly dinner. With simple ingredients, quick preparation, and plenty of room for creativity, these little pizzas are easy to customize and even more fun to eat. Set out your toppings, invite everyone to decorate, and enjoy a deliciously spooky meal together.
Print
Mummy Mini Pizzas
- Total Time: 45
Description
These spooky little pizzas turn classic pizza night into a fun Halloween treat. They are crispy, cheesy, easy to make, and almost too cute to eat.
Ingredients
- 1 lb. refrigerated pizza dough
- 1/2 cup pizza sauce
- 1 1/2 cups shredded mozzarella cheese
- 1/4 cup finely shredded Parmesan cheese
- 1 tablespoon olive oil
- 1/2 teaspoon Italian seasoning
- 1/4 teaspoon garlic powder
- 16 small black olive slices
- 1/4 teaspoon salt, optional
Instructions
- Preheat oven to 425°F (220°C) and prepare a baking sheet with parchment paper.
- Divide pizza dough into 8 equal portions and shape each into a 4 to 5-inch round or oval.
- Spread about 1 tablespoon of pizza sauce over each dough round, leaving a small border around the edge.
- Sprinkle lightly with Italian seasoning, garlic powder, and Parmesan cheese.
- Arrange mozzarella cheese in thin strips across each pizza to create mummy bandages.
- Place two black olive slices on each pizza to create the mummy eyes.
- Brush the exposed crust edges lightly with olive oil.
- Bake for 10 to 14 minutes, until the crust is golden and the cheese is melted.
- Cool for 2 to 3 minutes before serving.
- Prep Time: 15
- Category: Breakfast
- Cuisine: American